Blender Materials
- v0.8
Here is a roughly edited transcript of a lesson in materials in Blender, for Second Life.
JR: Add a material to my object and then open shader editor?
NS: yes. in each window the icon in the top left corner is the one defining its mode so one can always go there and change and the splitting and joining is like in excel basically.
JR: yes found that.
NS: ok just hover over with the mouse and select the function on the border. in the start i tried to set up special windows which suited me better but over time i found that keeping the default system is much more consistent. then change view mode (windows type) rather than fiddling with custom view setups
JR: yes probably
JR: hm i see that texture mapping is not intuitively obvious to the casual observer
NS: no. that is a very complicated area. I highly suggest you start to use the node system for that. it is fast and very potent and puts all functions into one window rather than a million of sub menus So you have a model now that you are happy with ?
JR: not entirely but i think it is time to learn to do things like rivets
NS: Yes
JR: so i am starting with a cube :)
NS: let’s look at the steps which are essential for building:
- do the model you like
- Do the UV unwrapping and the UV mapping
- Setup textures
So before you go to texturing you need to have a defined UV map. IF not you build would be in a uniform colour Did you make an unwrapping of the model ?
JR: no, how do i do that? JR: i thought i should start by making a material for it?
NS: imagine you have a 3d object and want to apply a paper sheet around it to make a texture it can be hard to fold a paper sheet around so it looks like no seams look
JR: yes i understand what unwrapping does. how do i trigger it?
NS: you go to UV edit. that is a special window, UV Editing, and then when there, select the object and go into edit mode
NS: then you can see all the build and if it is a simple one you can select all points in edit mode, but that is Blender’s default UV unwrap
NS: every object you add has a default UV setup that may not necessarily work for what you want to do
JR: let’s say that where i want to get to is to put a line of rivets around all the faces of my cube …
NS: yes
JR: so i probably want a bigger UV than it made?
NS: then you can get the actual UV map and use that as a guide to make all the bumps you need what material have you planned to use ? one for the metal ?
JR: i don’t understand the question
NS: one for the other parts ?
JR: oh I’m not there yet, let’s just texture a cube just to learn the basics
NS: the object may be made by different structures. OK, that is very easy because it is by default UV unwrapped but if not you select all the points in it and press U.
JR: ok
NS: that gives you the different unwrap options and you just use Smart UV project, which is the general form.
it cuts the object into adjoining faces so if you don’t care how the texture wraps around it is a great method for most
JR: yes. i kind of remember that from before blender had these node things
NS: yes this is not nodes, it is the same as previous.
JR: but don’t you use nodes to generate your rivets?
NS: now if you like the model to split in certain parts. You can use nodes for that but would take you a good week for that to get working. Normally we just use a bump map to do those things, just make dots in gray scale
JR: hm ok
NS: and they will appear as bumps in the texture. But let’s get the cube unwrapped. say you would like the lid and the bottom to be on their own. could be wood planks and the the 4 sides
JR: yes i have it unwrapped in an 8x8 map JR: like a cross in the center of the 8x8
NS: yes it is the standard but often you like not to follow that so you need to be able to control the unwrapping or add seams to the build where the unwrap splits
JR: so do i want to add seams at the top and bottom?
NS: yes just to teach you how to a box like this
so seams are added by selecting edges and then go to edges / mark seams or alternatively Ctrl E / M
JR: ok i marked a seam at the top of the cube
NS: ok then try the bottom
JR: ok did them both
JR: now do i unwrap it again?
NS: yes
JR: regular unwrap or smart?
NS: you get a little menu when unwrapping a little bar where one can control features as distance between island of the unwrap
JR: when i did regular unwrap it made a mess
NS: but the two faces top and bottom should be independent now the sides will be a mesh probably
JR: yes a real messy one
NS: so add one more seam line to one side of the box
JR: ah ok
NS: then it unwrap like a line with faces on a band
JR: ah ok and then i can use margin to space out the separate ones
NS: yes exactly. and you can save that UV map and take it into PhotoShop and then add thing there to your texture and they will be placed according to the unwrap
JR: I do not have PS but i suppose i could draw on it with procreate or something. JR: in what form can it be saved? just as an image?
NS: in what ever format you draw program use blender exports all types of textures so format can be anything. But that is the basic thing to do, because as soon as you make more difficult models - not boxes or cylinders you run into strange mapping of the textures
JR: yes
NS: In most cases. Let’s say one have a metal build thing and want to do it quick and dirty. One can just make the seams and select all the elements with a specific material and unwrap the whole thing in one go, and if one has two materials do the same for the other.
JR: yes
NS: OK so supposed you are happy with the unwrap, time to see how textures look at it
JR: ok yes
NS: now you have a texture you like to use ????
JR: i can use any random one really
NS: yes so the easy one it just to use an image
JR: yes
NS: and wrap that to the box
JR: yes, how do we do that?
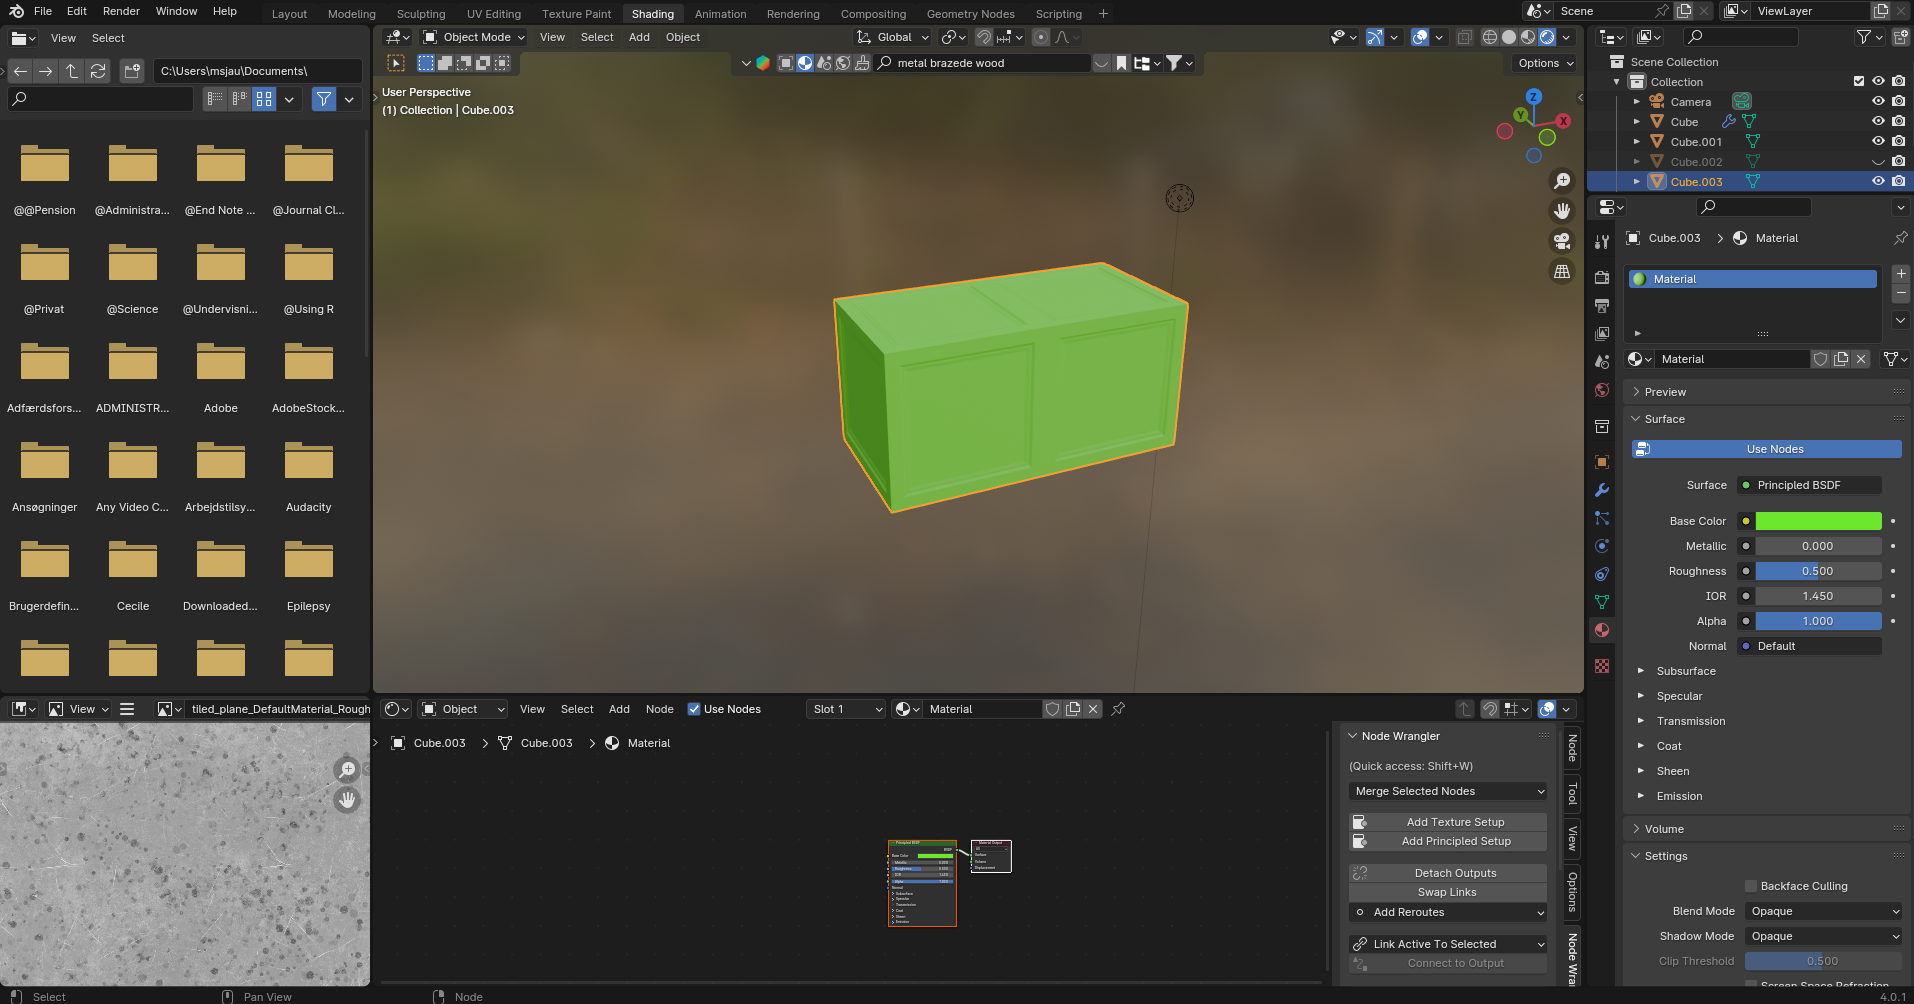
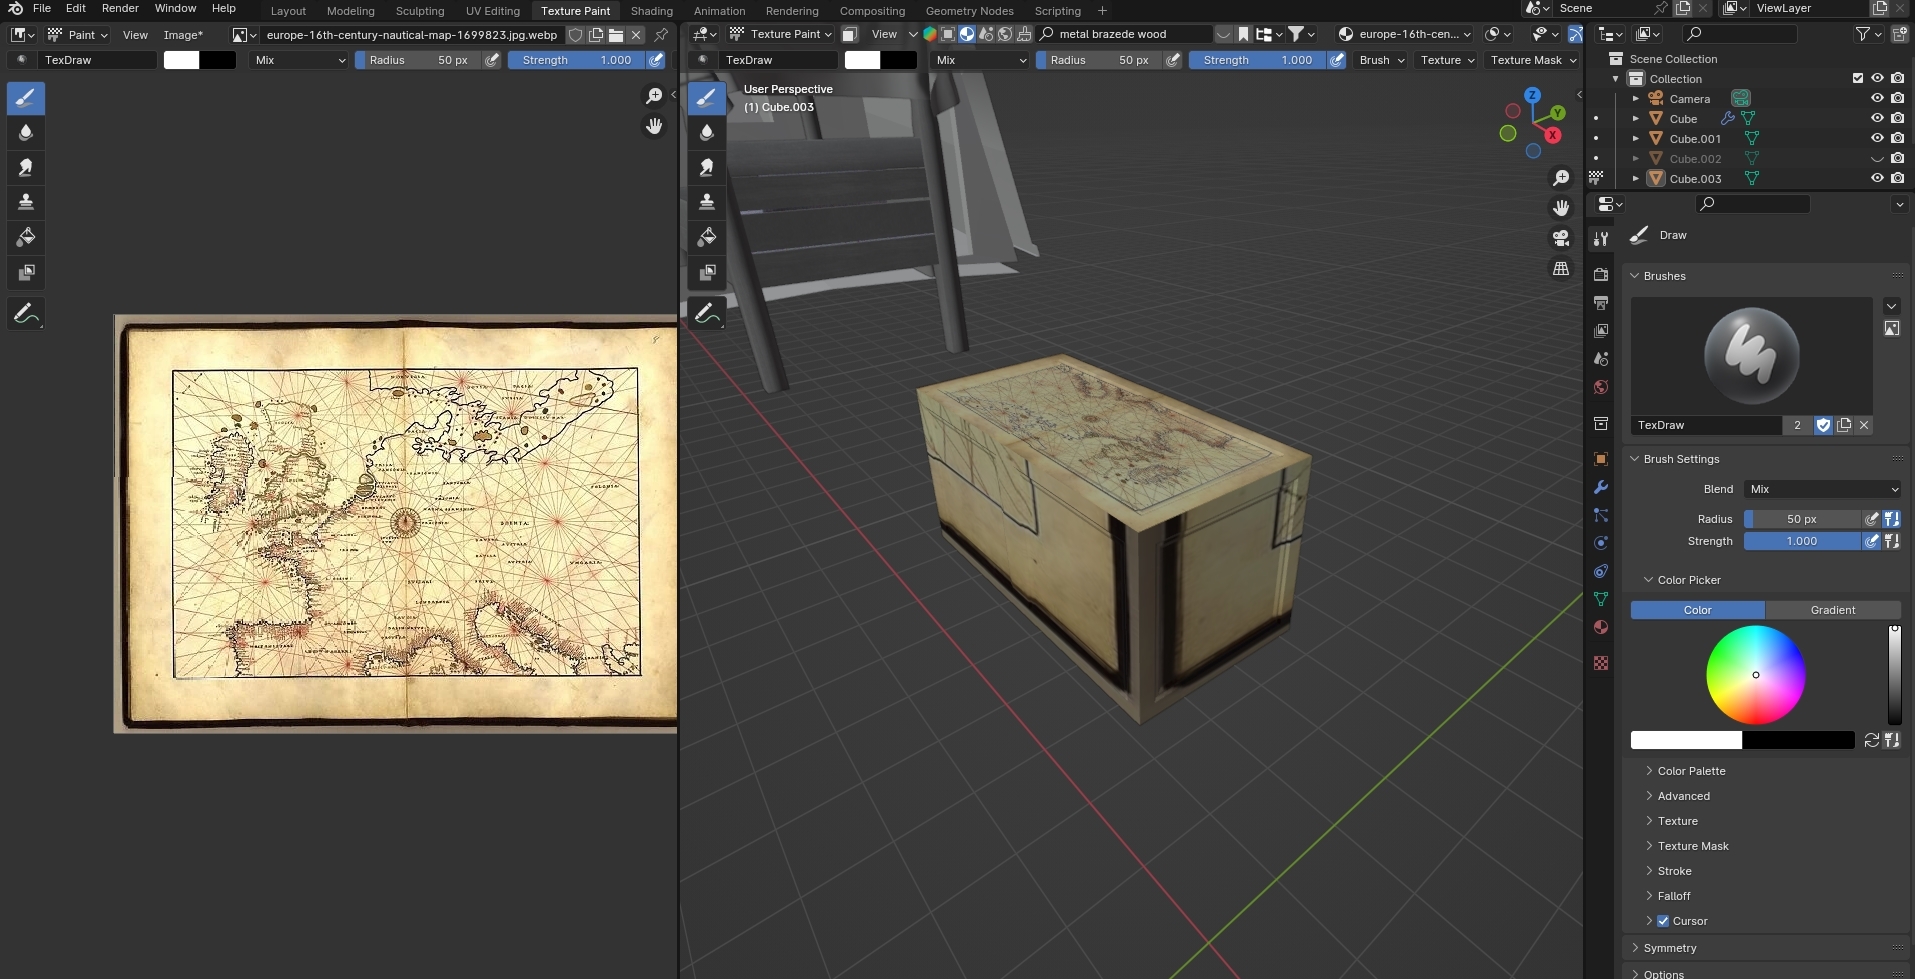
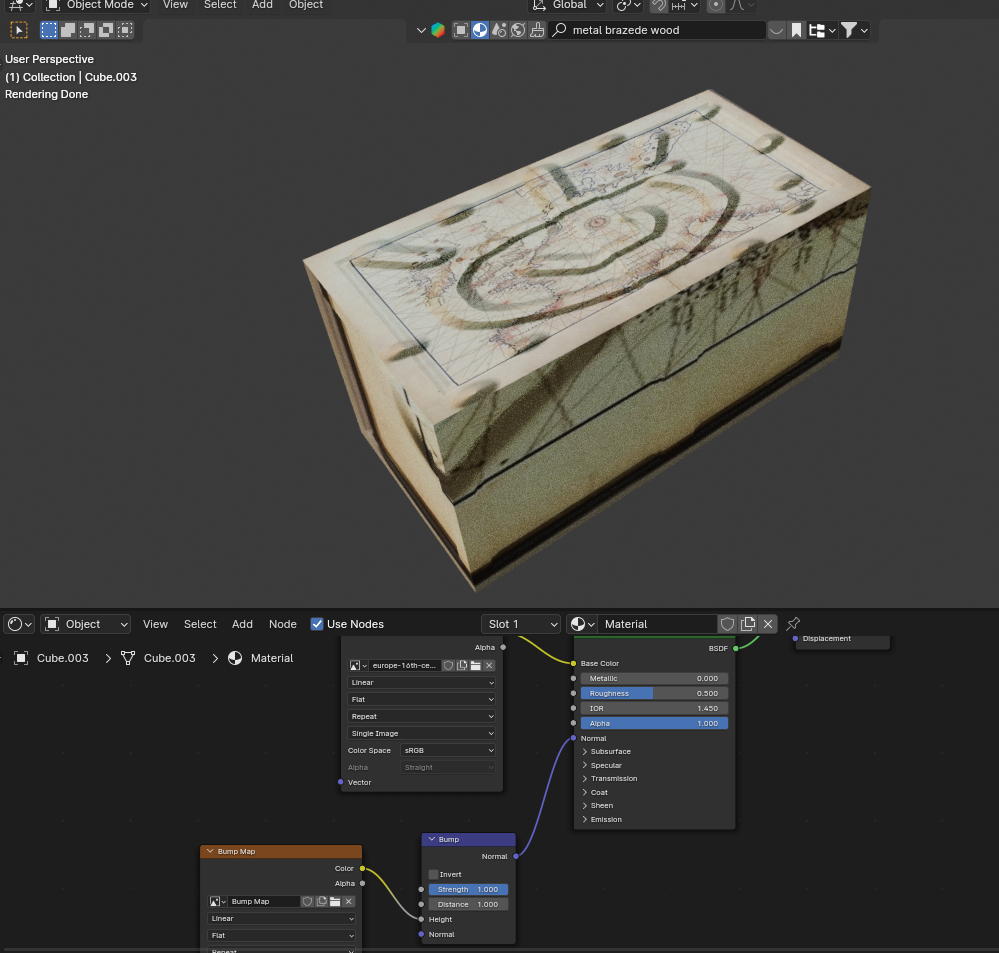
NS: Now we leave the UV editor and go to the Shading panel. That is where we do texture setups. you have 4 main panels there, the model,
JR: ok. because of whatever i did there, i have a Principled BSDF putting green on the model
NS: and to the left of it a directory … Yes it uses a default.
JR: yes JR: so somewhere in the folders i would find a texture?
NS: so the whole thing should look like this
NS: now find the texture to use and upload that
JR: into SL you mean?
NS: If you have one in SL you need to download it: you need to find a local texture in your computer to use.
JR: I have a texture on my desktop, what should i do with it? JR: I see it in the directory window
NS: yes, under that there is a texture display window, and you need the texture to appear in that. You see 3 lines in the top row of the window. It has an option for uploading a texture.
JR: The one that says View New Open?
NS: yes. Image open, next to it.
JR: In the lower left panel? Not the directory one?
NS: OK there is an other way much easier use the directory folder to find you texture click and drag to the window below
JR: ok tried both. anyway now i have the image.
NS: Good. So you get an image. Next you need a material and you have that green stuff you can use in the panel to the (far) right
JR: yes the principled BSDF thing
NS: yes. so that control panel is the most confusing thing in blender. on the left side there are a lot of icons
JR: :) i agree so far :)
NS: each with different content so you of course need to be in some window doing textures material which is some red circle with a map on
JR: i don’t see any icons on my screen or your last picture
NS: yes you do a little (vertical) row of icons
JR: oh you mean the panel on the far right?
NS: yes. in the left side of that
JR: yes and pick the map one?
NS: There is a vertical row of icons and you pick the one which is a red circles with something on “maybe a sphere”
JR: yes i think it is a map :)
NS: So it looks like my picture. Yes. So that is where one controls textures. Now to associate the image with the shader
JR: ok
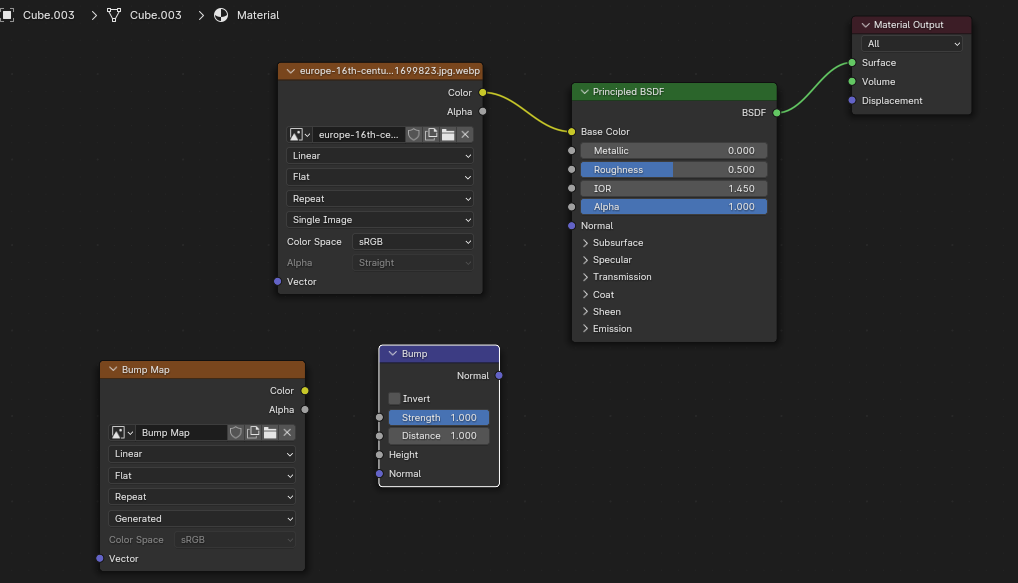
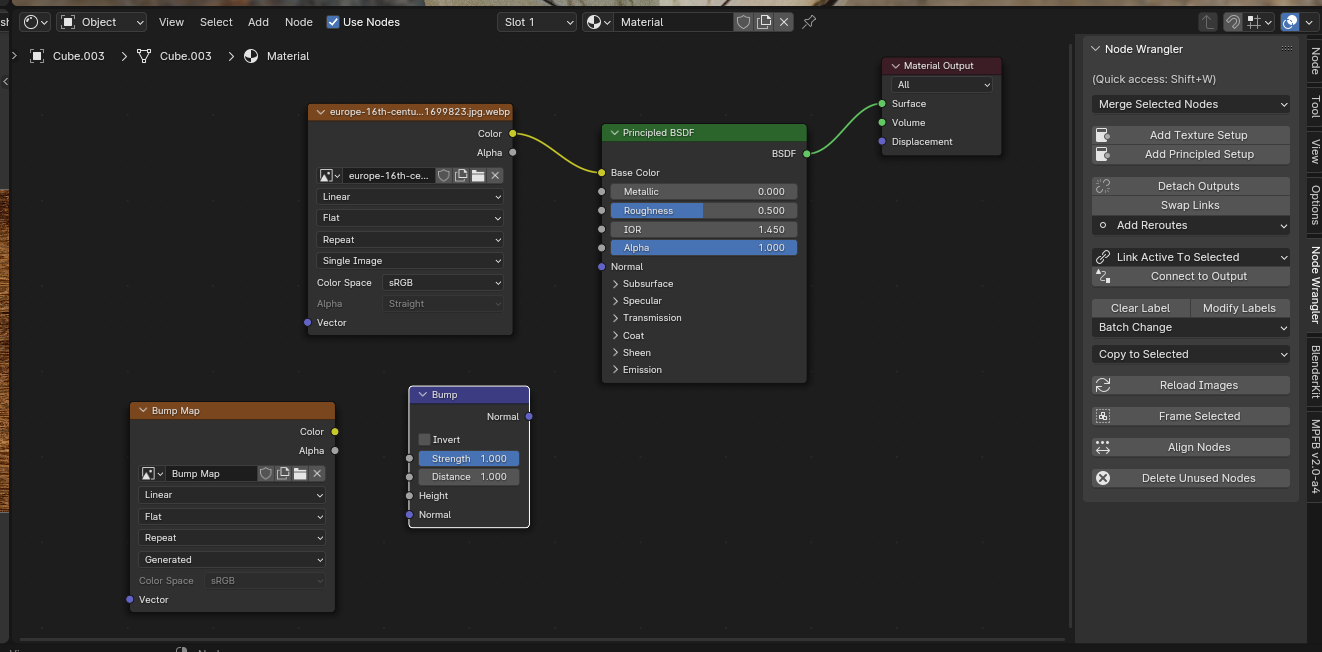
NS: under the center window there is the node window
JR: yes
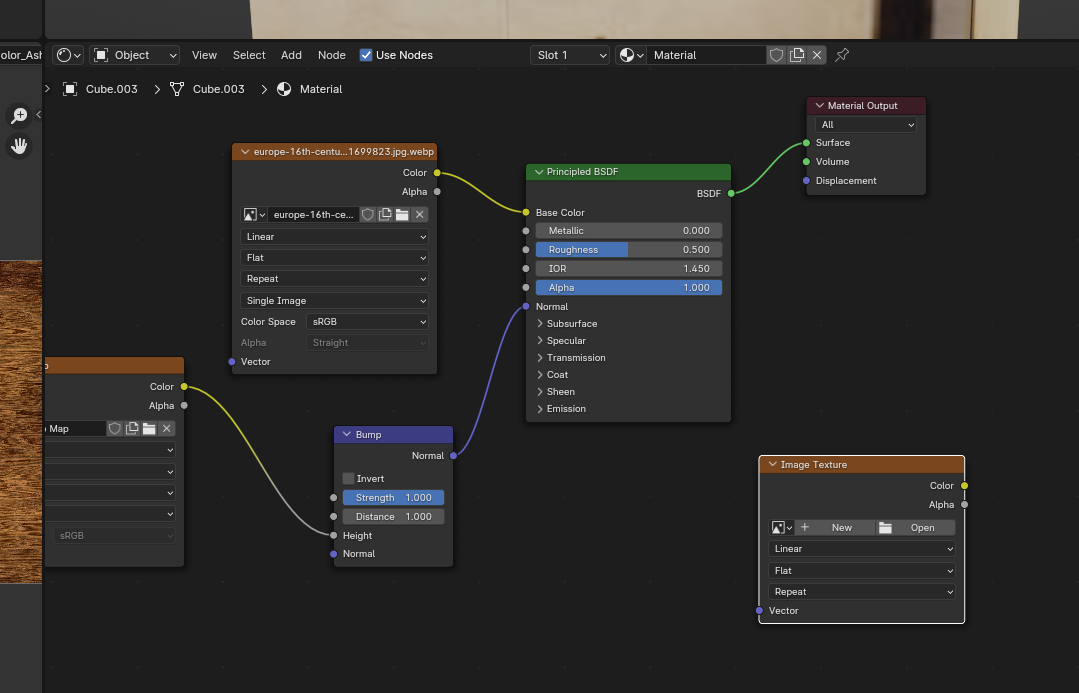
NS: and you have the principled shader set up, but you need a texture. So you need a node to grab the texture and use that as colours. So in the top menu you find ADD / texture / Image texture. That should add a texture node
JR: yes done
NS: in the little box defining the texture there is a place called new open
JR: yes
NS: and a funny icon in front. The little icon in front is used to select already uploaded textures.
JR: ah yes picked the one from the list
NS: so click that. You get a list of textures you have added, and you select the one to use.
JR: and i wire color into base color and there it is
NS: exactly. And you box should be textured
JR: now when i export that to DAE will it retain that texture?
NS: no. DAE is erratic with textures. It should be possible but I’ve never had it work. So one upload the box as DEA no textures.
JR: again in SL
NS: and [export?]the textures you used afterwards, and then texture it in SL
JR: so given this texture can i see it on the UV and then adjust where the wrapping is?
NS: yes. we go back to the UV thing UV editing. Here’s a picture:
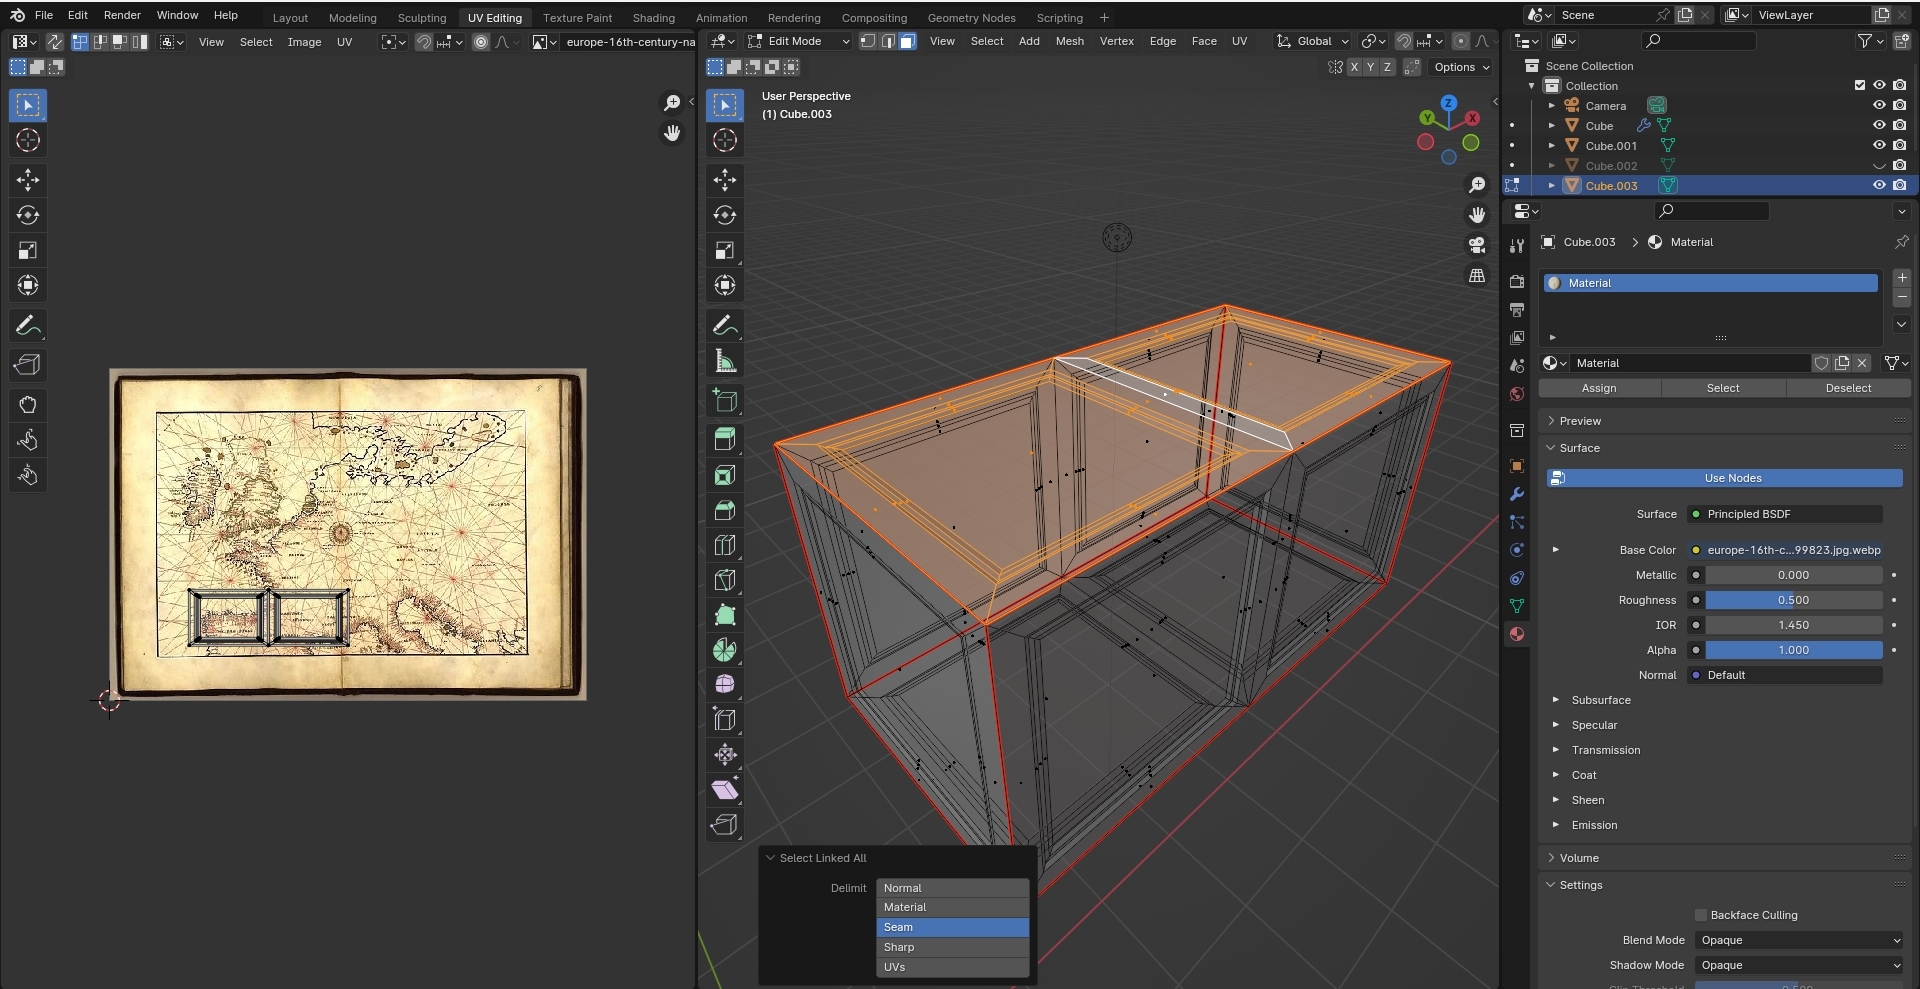
Here i am back in my box a bit more complex. I have it in edit mode and selected all the faces on the top, and in the right panel you see the UV MAP, and i selected an image that was used to texture. Now i can decide where i like my UV map to be. Maybe I would like the top of the box to have the whole map

like this and i can get my texture displayed as i like
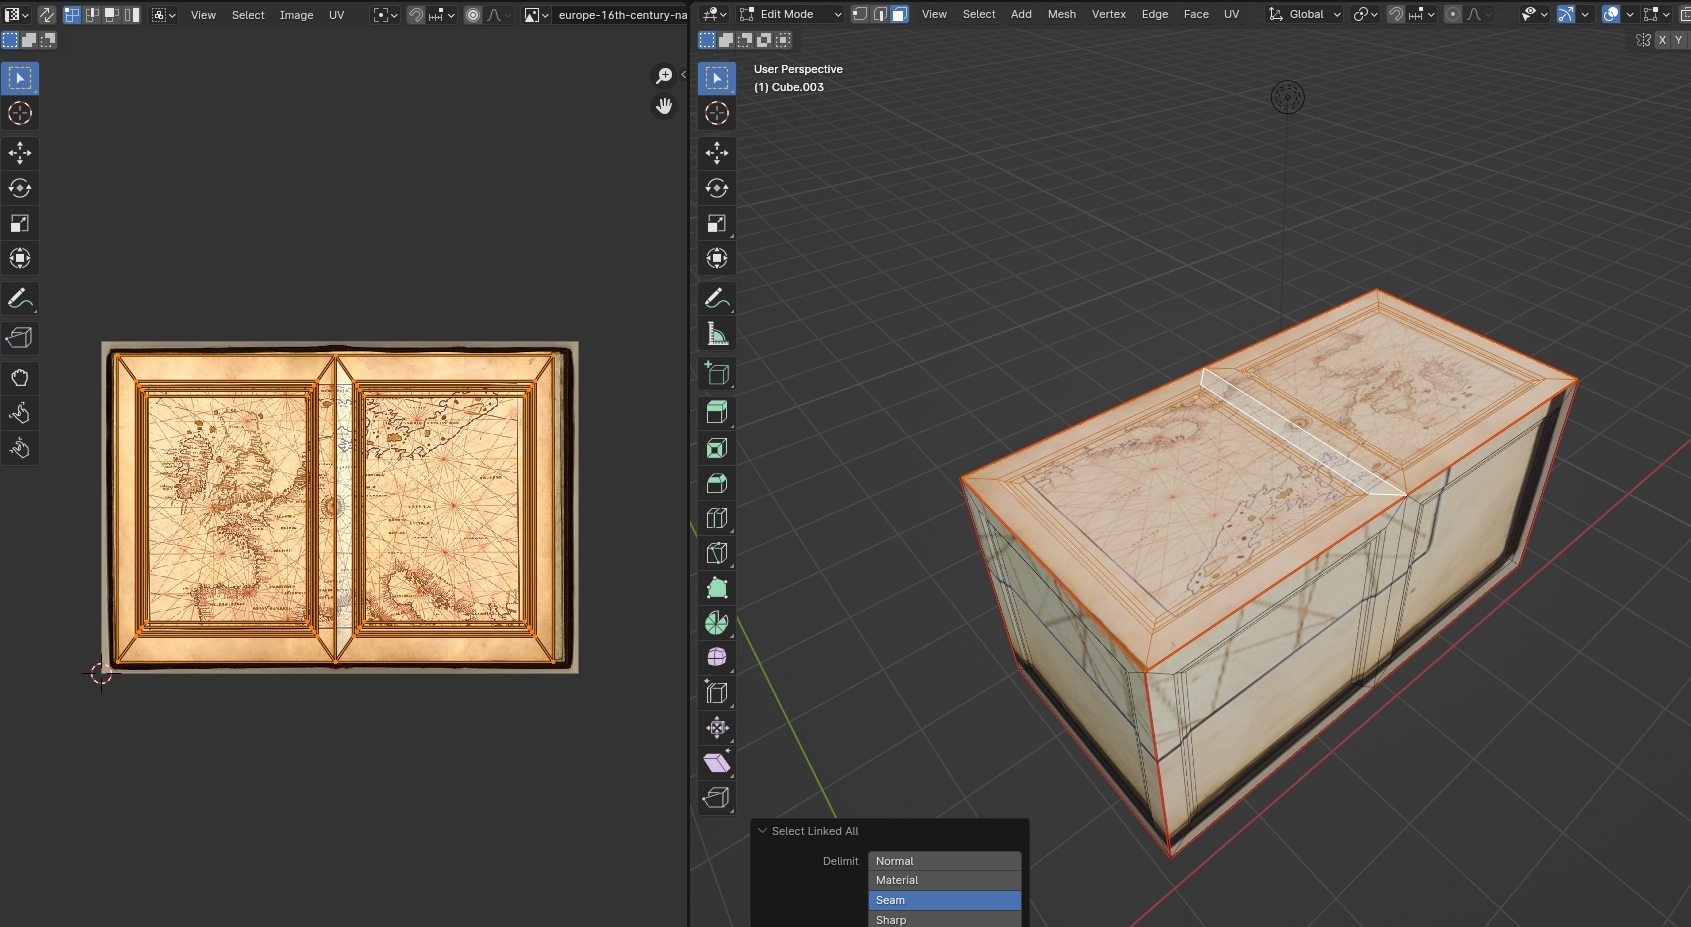 So if you have a special texture with things you want to display
you can fiddle the UV map around
to cover those areas
So if you have a special texture with things you want to display
you can fiddle the UV map around
to cover those areas
JR: Needed to set the view to see rendered view here ?
NS: so you need to display it differently yes you have those setting fo mesh and faces and textures so need the textures to see those
JR: ok so i can drag theUV things around to line up with my input texture JR: and then when i export … and put that texture on that material … voila
NS: yes then you can export the model and the texture and when you add the texture in SL all should be perfectly aligned
JR: yes. what was interesting is the SL showed the texture … but did not load it
NS: no
JR: so if there were separate materials they would be faces in SL?
NS: one needs to get it separately or you can try to add the texture upload with the model there is an option but i have very bad experiences with that
JR: yes i tried and it is in the DAE but still doesn’t come in to SL
NS: No
JR: can you sketch for me the procedure for doing a bump map? or is this enough for one day. I’ve used up your whole day so far.
NS: the bump map is a gray map black is low white is up so we can do a simple thing to get you started
JR: ok JR: just a bump or crease or something simple
NS: OK the bump map should start out as a uniform gray colour 0.5, 0.5 0.5 RGB So the process is to make a picture that can act as a bump map we can do that in blender
JR: yes
NS: First let is go to the texture paint mode the panels call textures paint the view is called texture paint
JR: ok yes
JR: that still has my starting picture in it
NS: look like this for me
JR: yes exactly
NS: the first thing we need is a new picture in the left panel there is a Image menu So Image / New and you get a new picture you can name and save should be all black
NS: you can name it in the bar in the menu line say bump map “Bump Map”
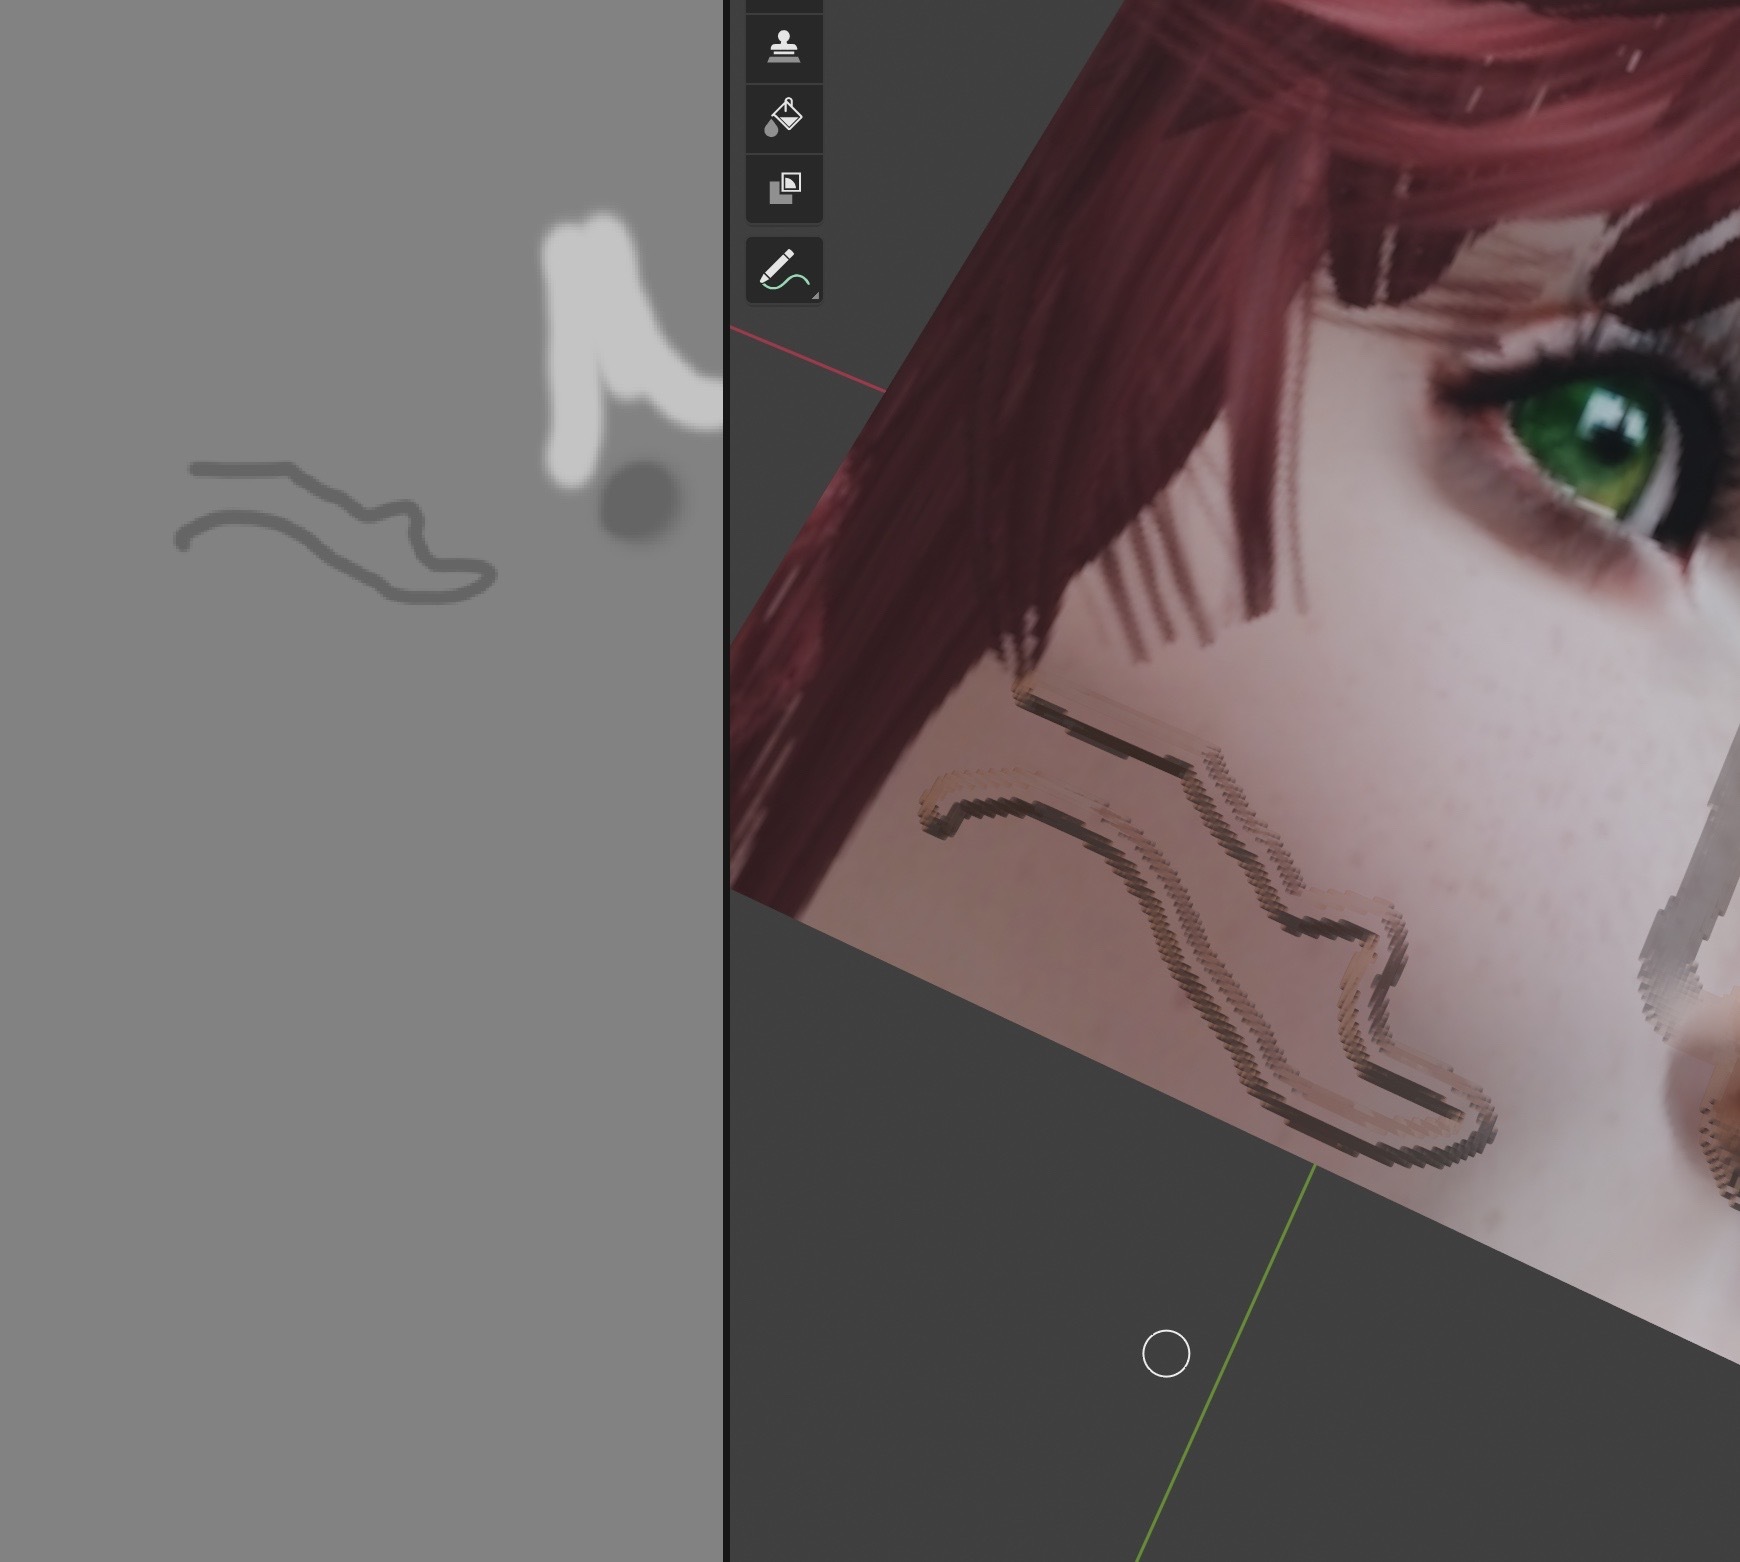
NS: OK we like some bumps on the model so you draw a few white lines across the black image
 like this or anything
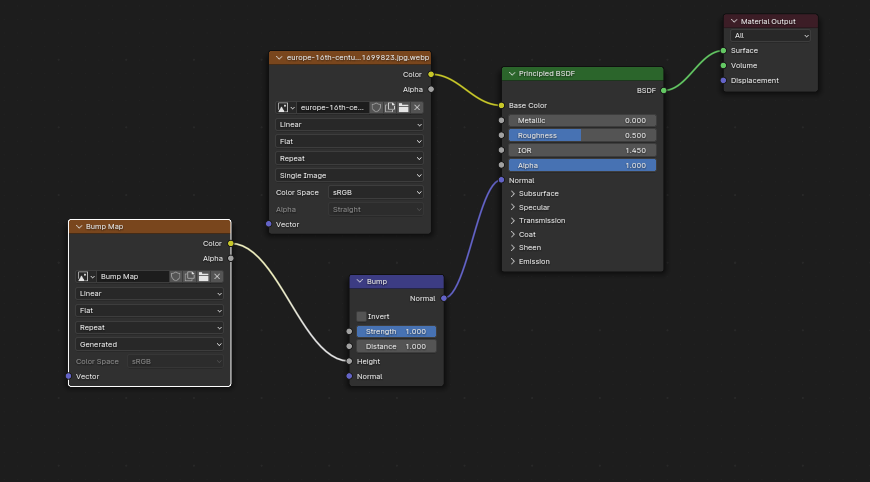
NS: then we have created the basis for a bump map but we cant see it on our model So we need to associate the bump map image with the texture nodes for it to display
NS: So we go back to Shading and you add a new node
NS: from the node menu no it is a bump node and a texture So first the texture add one new and associate it with the bump map
JR: confused. do i add a texture node and put the bump map into it?
NS: No you first add the texture it is one node then you add a bump node ADD( VECTOR /BUMP
JR: add image texture? i am not clear on how to add the image we just drew.
NS:
 like this
you can see in the texture
node
there is that little icon to select textures in front of the name field
so click that and select the texture
like this
you can see in the texture
node
there is that little icon to select textures in front of the name field
so click that and select the texture
JR: i am behind. is the Europe thing an image texture node?
NS: no in the node editor window
 like this
JR: ok i do not know how to get those two new nodes in JR: what did you add?
NS: first i added a additional texture node then i added a bump node then i associated the texture node with the bump texture
JR: ok add vector bump
NS: yes so you have two new nodes and then the texture node need to be associated with the bump map picture you made so set the name to that clicking the little icon in front of the name field and select the texture from the list
JR: ok got it
NS: ok now we like to test so drag the colour from the new texture node to the BSDF shader you should display the bump picture on your model
JR: yes
NS:
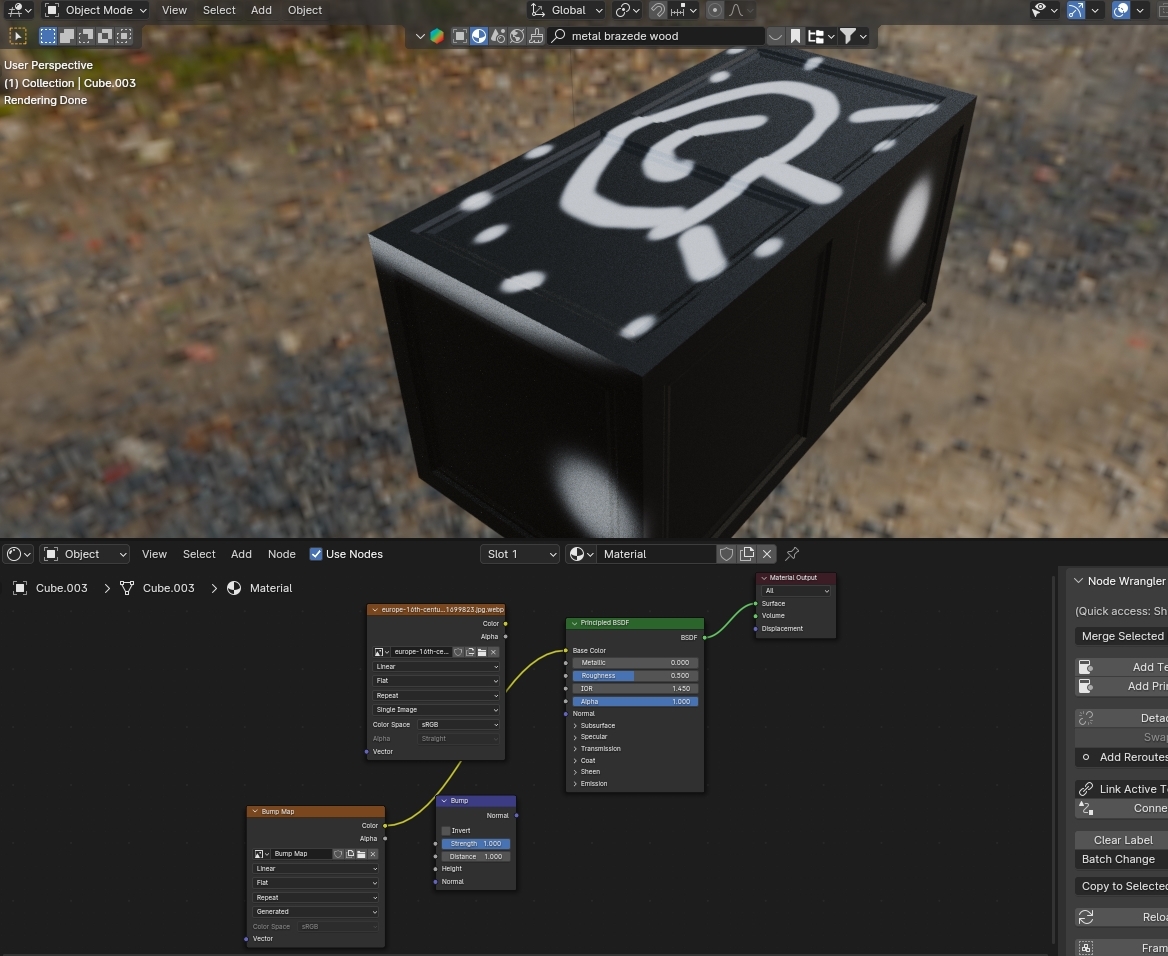 like this
so you are use you got th right texture
like this
so you are use you got th right texture
JR: yes right
NS: but you like to make it into a bump thing
JR: so wire it to height?
NS: so we drag the texture through a converter
and then from the output of the bump normal
to shader normal
and restore the colour to the original picture
 so i got this
JR: mine looks mostly like a dark smear across the picture
NS: can i see your setup a screen dump
JR:

JR: i think it’s probably right just looks weird because of my weird image
NS: yes ok it of course depends on the bump map but it is ok
JR: with a sensible texture it would look better.
NS: depends on how the light falls
how steep the side are
if you make like total black and white
it will not work so well
it is best for gradual changes in surface
but that is the very basic setup
Now
thing can get nicer
there is a little trick in Blender
you go to the node window
and click in the node with the bump map
so it get highlighted
 then return to texture paint
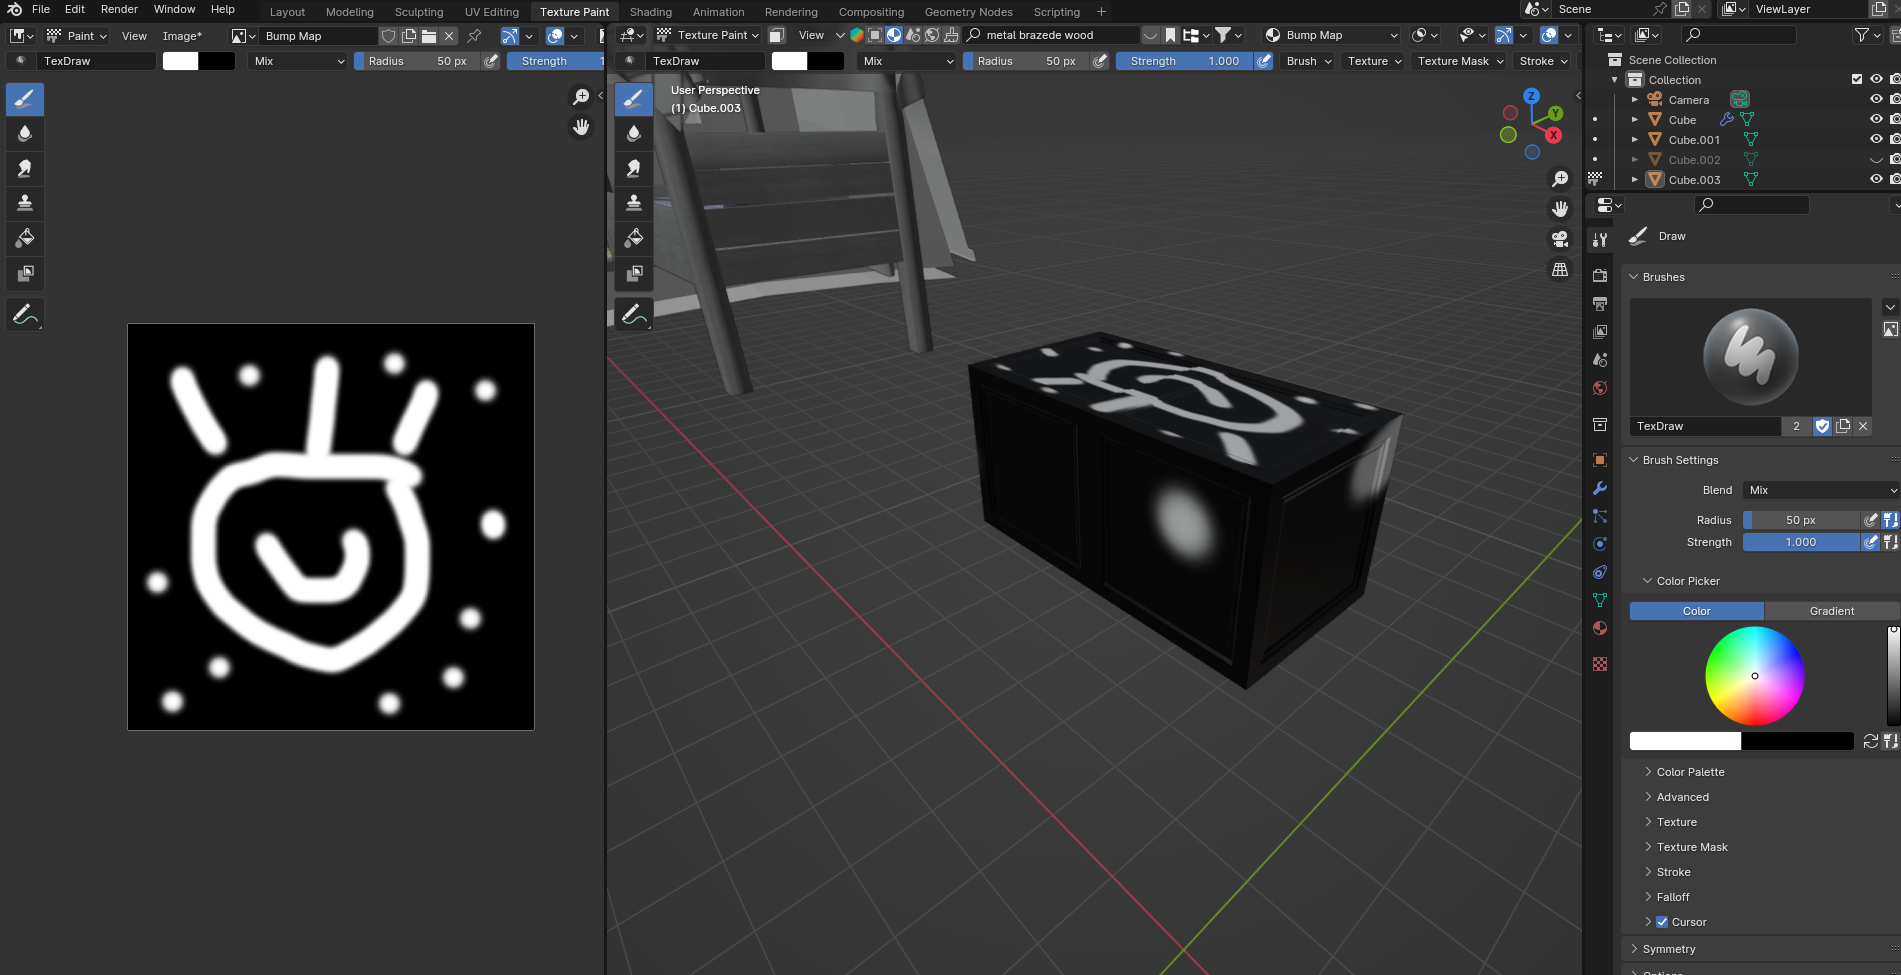 and you should have this picture
where the bump map is displayed on your model
and then you can draw directly on you model
and it will be reflected in your image
and you should have this picture
where the bump map is displayed on your model
and then you can draw directly on you model
and it will be reflected in your image
JR: ah yes i see :)
NS:
JR: white is up black is down?
NS: like this yes and then one can use all the paint system in blender to shape things make grooves and lines and whatever place dots as bumps engrave with a gray colour and so on but you get an idea of how the bump are placed
JR: it seems like it draws with a hole in the brush
NS: ok so maybe you have a fun brush to go through the option of drawing in blender it a study in itself basically it can do anything Photoshop can do and more
JR:
NS: but it is much much more complicated ok the whole is the white top you draw a white line on a black background white will be all flat max height therefor a real bump map
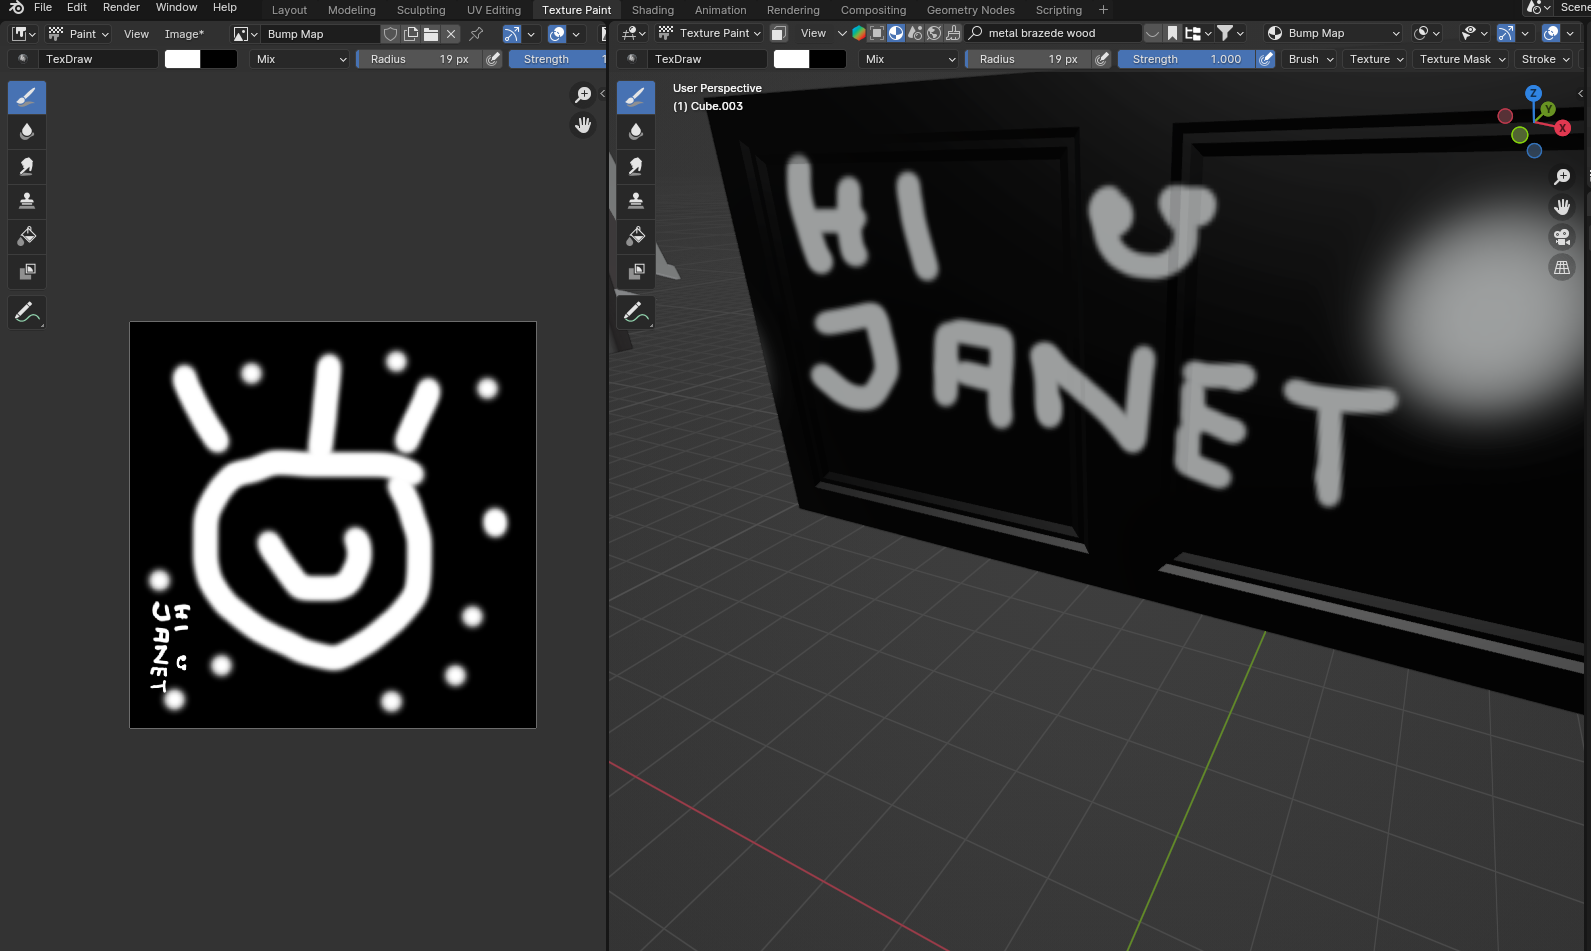
JR: but see how there are two lines there? I just drew the one shape
NS: is starting out as a gray scale image set to neutral 0.5 gray
JR: and it’s kind of a double image
NS: because you see reflections and shadows and it all depends on how light affect the surface if you have light from you viewpoint you will see nothing no shadow so restrict yo bum to within the gray scale
JR: In this picture …
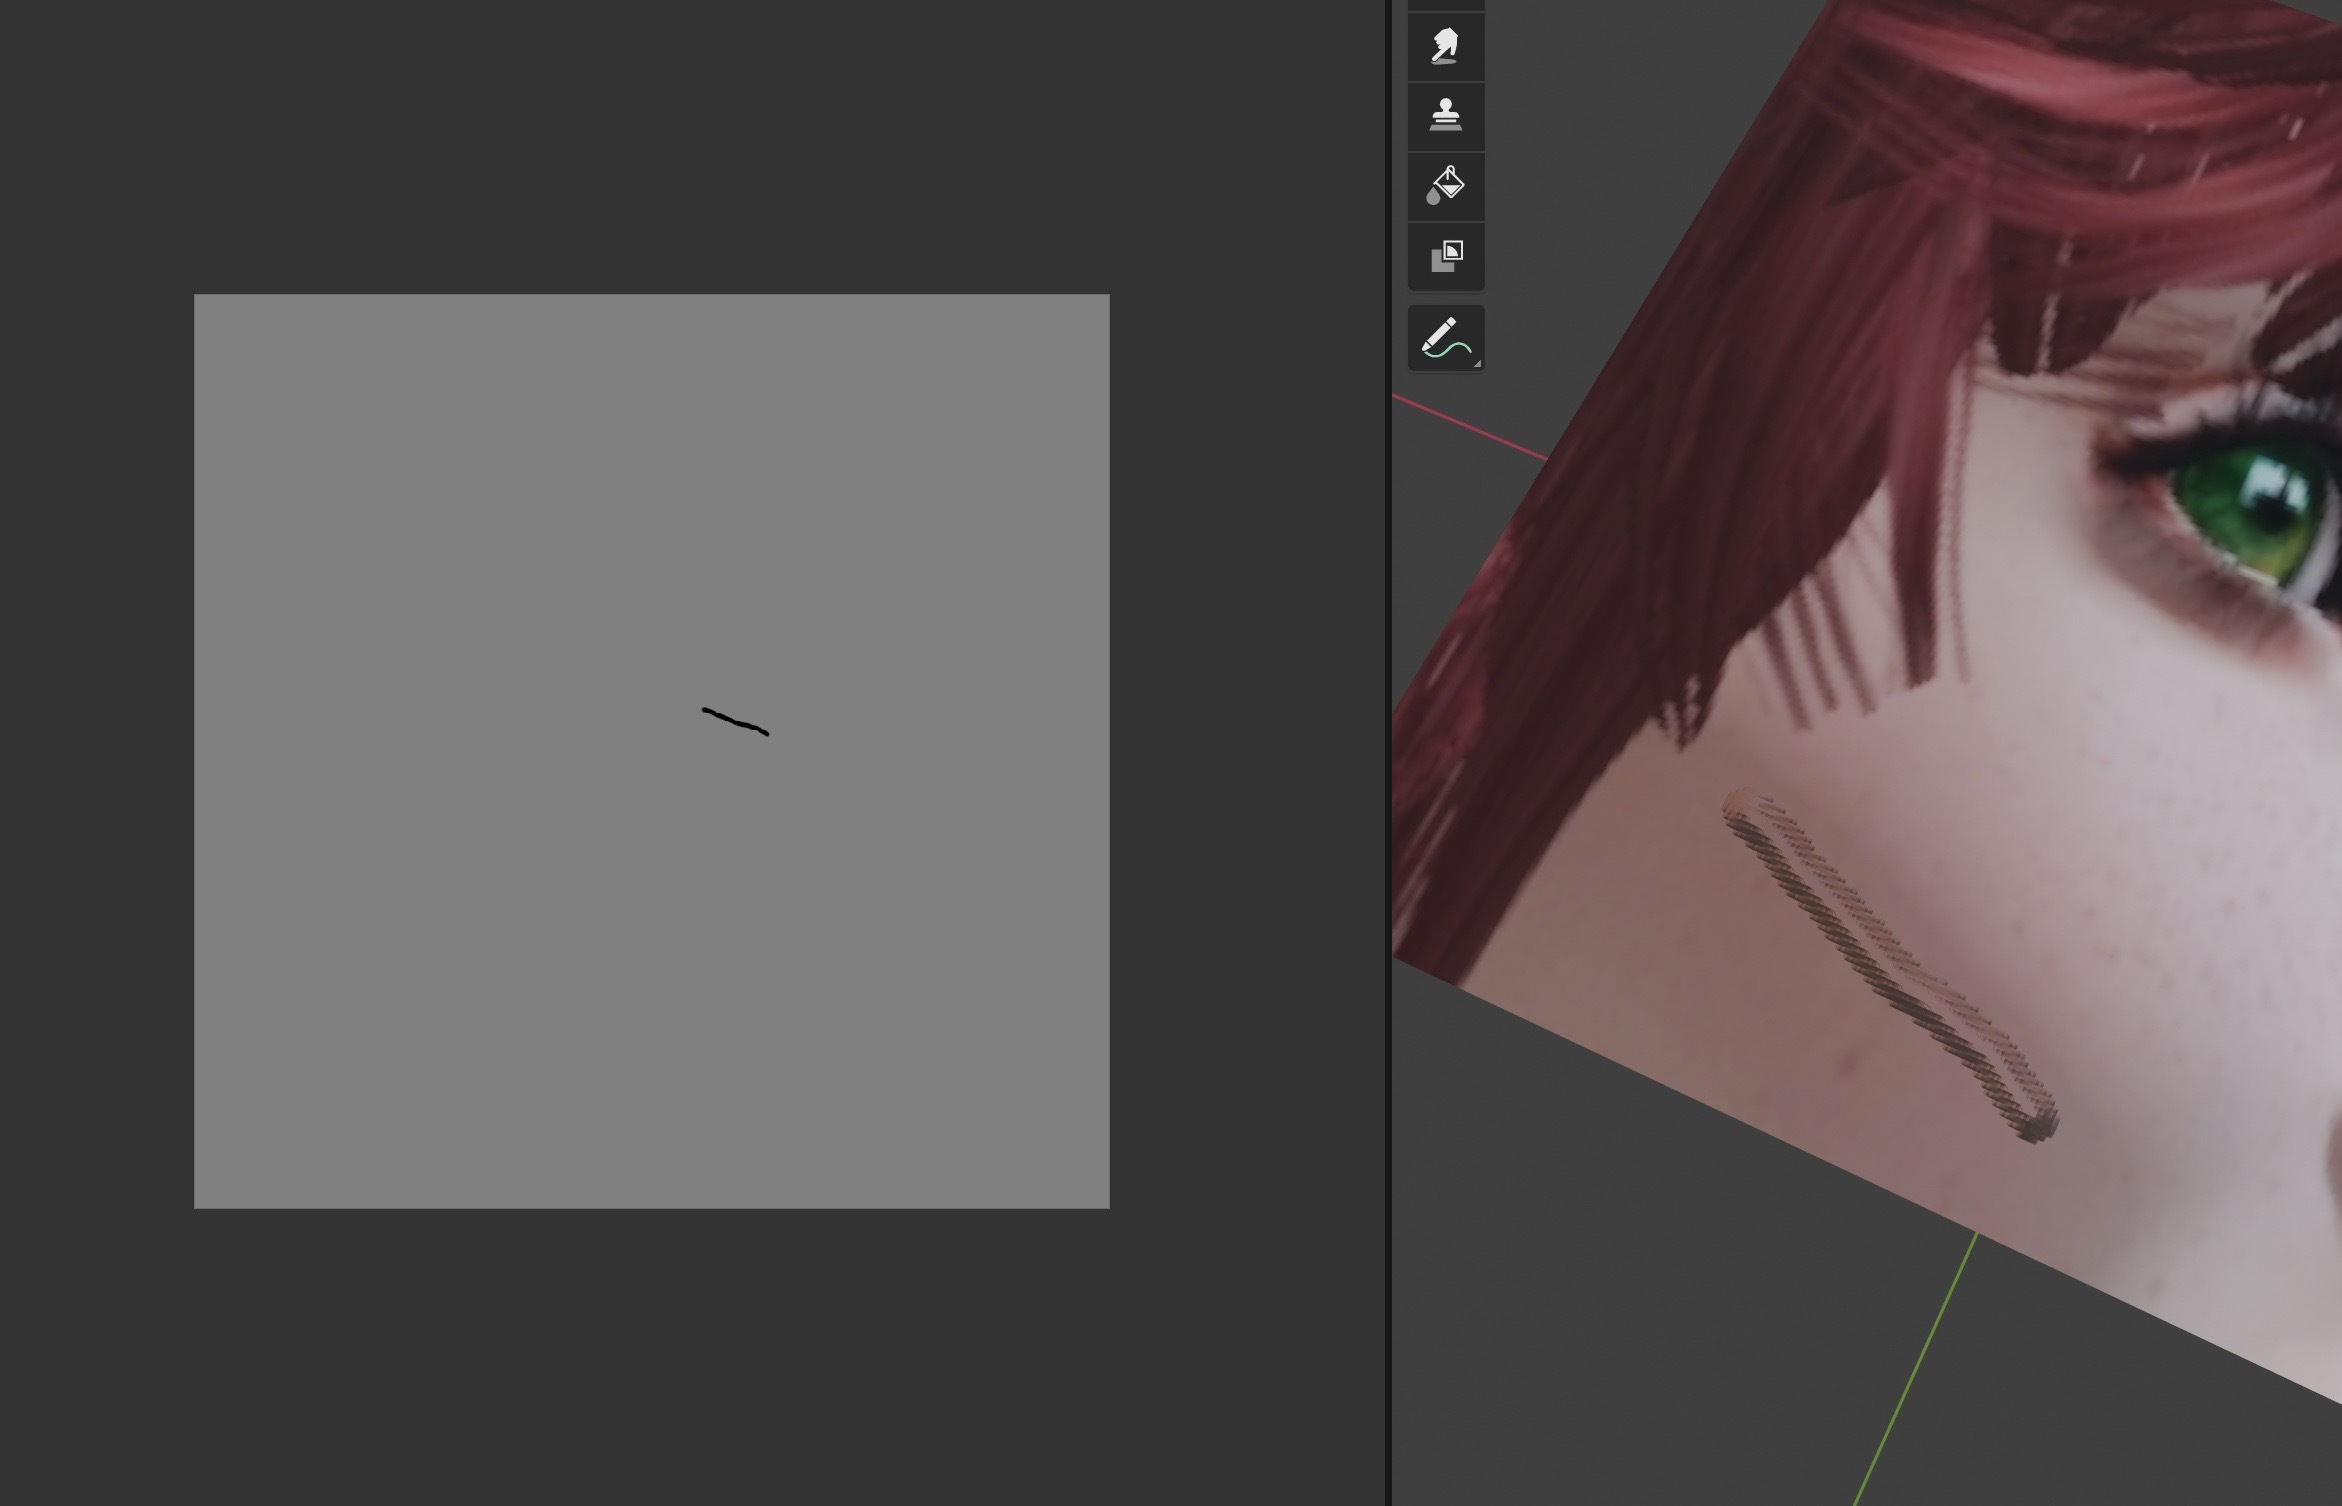
JR: I just drew one black line over neutral gray but there are two lines on the image. i do not understand why.
NS: yes
DS: that’s the 3d view
it has to do with image resolution
and is a 3 D view
DS: so it looks like embossing
find a softer brush
and a bigger line
 the same in my example
JR: ok. how do i get a “softer brush”?
NS:

JR: oh i just have one, i think: texdraw
NS: there is a huge system to set up brushes with these menu headlines
JR: ah wonderful :) JR: i suppose it can import .brush files or some such?
NS: yes that is possible too but the best you can do is simply not use white use a shade fo gray and then so to fall off and select the fall off around the brush
JR: yes. oh before i pass out … how did you make that round one on your example
NS: was just here i did not select anything special for this example
JR: so that is just a single dot? JR: ah yes i see
NS: yes
JR: well i have more than enough to start me off. this was very kind of you to walk me through all this
NS: just a single dot and you can set dot spacing
JR: thank you very much :)
NS: and make them run at a line and all kind of things So the last thing we need before ending today is how on earth does one use that in SL Because we have Normal Maps here no bump maps So we are in some small troubles So we need to convert the bump to a normal map Lucky the node system support that too So lets go back to the SHADING panels and add a new texture to the system of nodes
JR: ok
NS: i add a stand alone image texture node
 like this
JR: ok
NS: if i press new in the texture node i can make a new image
JR: yes. blank?
NS:
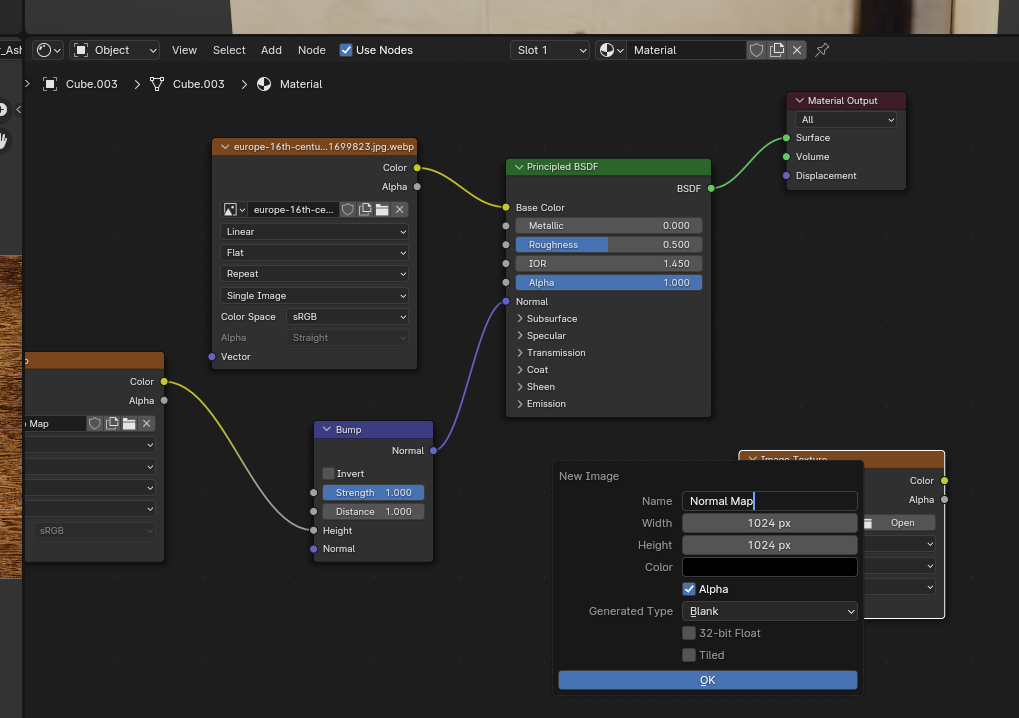 call it maybe normal map
you can rename it anytime
should be a blank black image
call it maybe normal map
you can rename it anytime
should be a blank black image
JR: and alpha on
NS: alpha off only 3 channels RGB you can display it in the picture display panel by finding it in the list see it is a black square
JR: wait please JR: your picture showed alpha on
NS: Yes doesn’t matter THe real thing is alpha off Normal map doesn’t have alpha channels
JR: ok so anyway i get a black thing by opening the normal map on the left
NS: you got it?
JR: i think so
NS: super So next thing is to bake a normal map from what we have the material node system we created
JR: ok. ready. :)
NS: So go to the node panel ensure the Normal map texture is highlighted then go to the RIGHT side panel
JR: yes
NS:
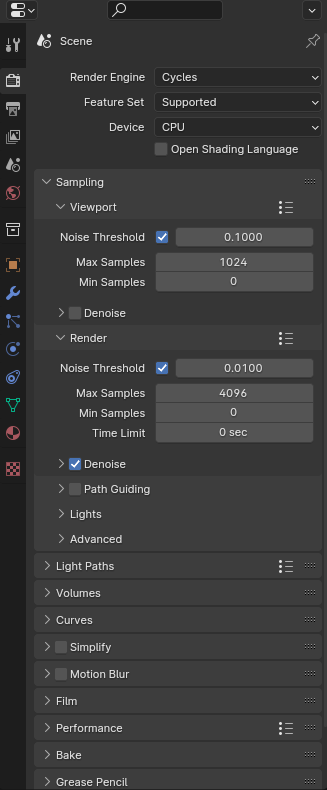 go to the near top
and click the render icon
and select the render mode to cycles
go to the near top
and click the render icon
and select the render mode to cycles
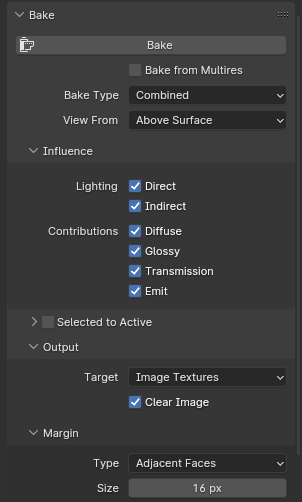
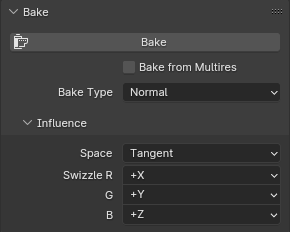
NS: now scroll down tot he bottom of the panel you find a entry called bake
NS:
 looks like this when opened
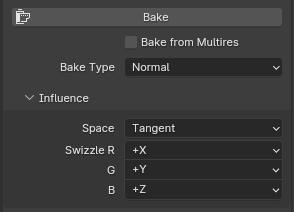
NS: you have to change the bake type
in the top of the menu
to normal
 and then scroll down
n just press bake
the button bake
you will get an error if no object is selected
then select the cube in object mode and try again
and then scroll down
n just press bake
the button bake
you will get an error if no object is selected
then select the cube in object mode and try again
JR: i do not see a bake button
NS: it is on the very top
gray bar call bake int he bake menu
the very top thing
above where you set the bake type
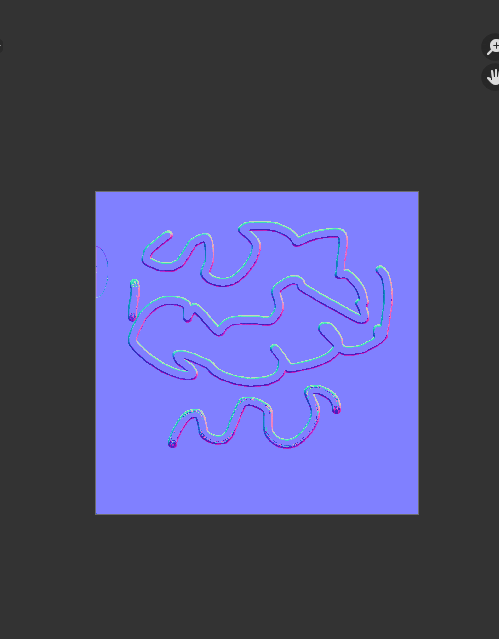
JR: ok it slowly did something JR: over in the image window
NS: yes it may toke some time and the image window
JR: kind of looks like the other one JR: but colored
NS: yes bluish
JR: yes
NS:
 like this
something
that is the normal map
like this
something
that is the normal map
JR: yes
NS: Now if you have a more complicated setup you may bake a lot of normal maps same time
JR: do i wire it into the diagram?
NS: NO you save it as a picture
JR: let’s stick with simple for now, my brain is full :)
NS: called something like JR_Normal Just save it and then upload to SL
JR: ok how how do i save it?
NS: In the texture window where you see it you can click the icon with 3 horizontal line there is a save image operation will save the picture on display best to save as PNG
JR: yes got it
NS: Super then upload to SL
JR: ah got it
NS: smiles ok then you need to add it to the texture on your SL object as a normal map
JR: is that bumpiness or shininess
NS: bump
NS: but that is the principle when one is only using blender to do it
JR: super. i am so grateful for this help
NS: yes
JR: it should get me started
NS: smiles