Texturing
A session on texturing in Blender from NS.
NS: So a new blender session I think we should start with a cube as always
NS: and a good way will be to add a texture So let me just find soemthign usefull
ok just to make thign a bit different today we star t out with a cube and then add a metal surface. try to find a asimple texture.
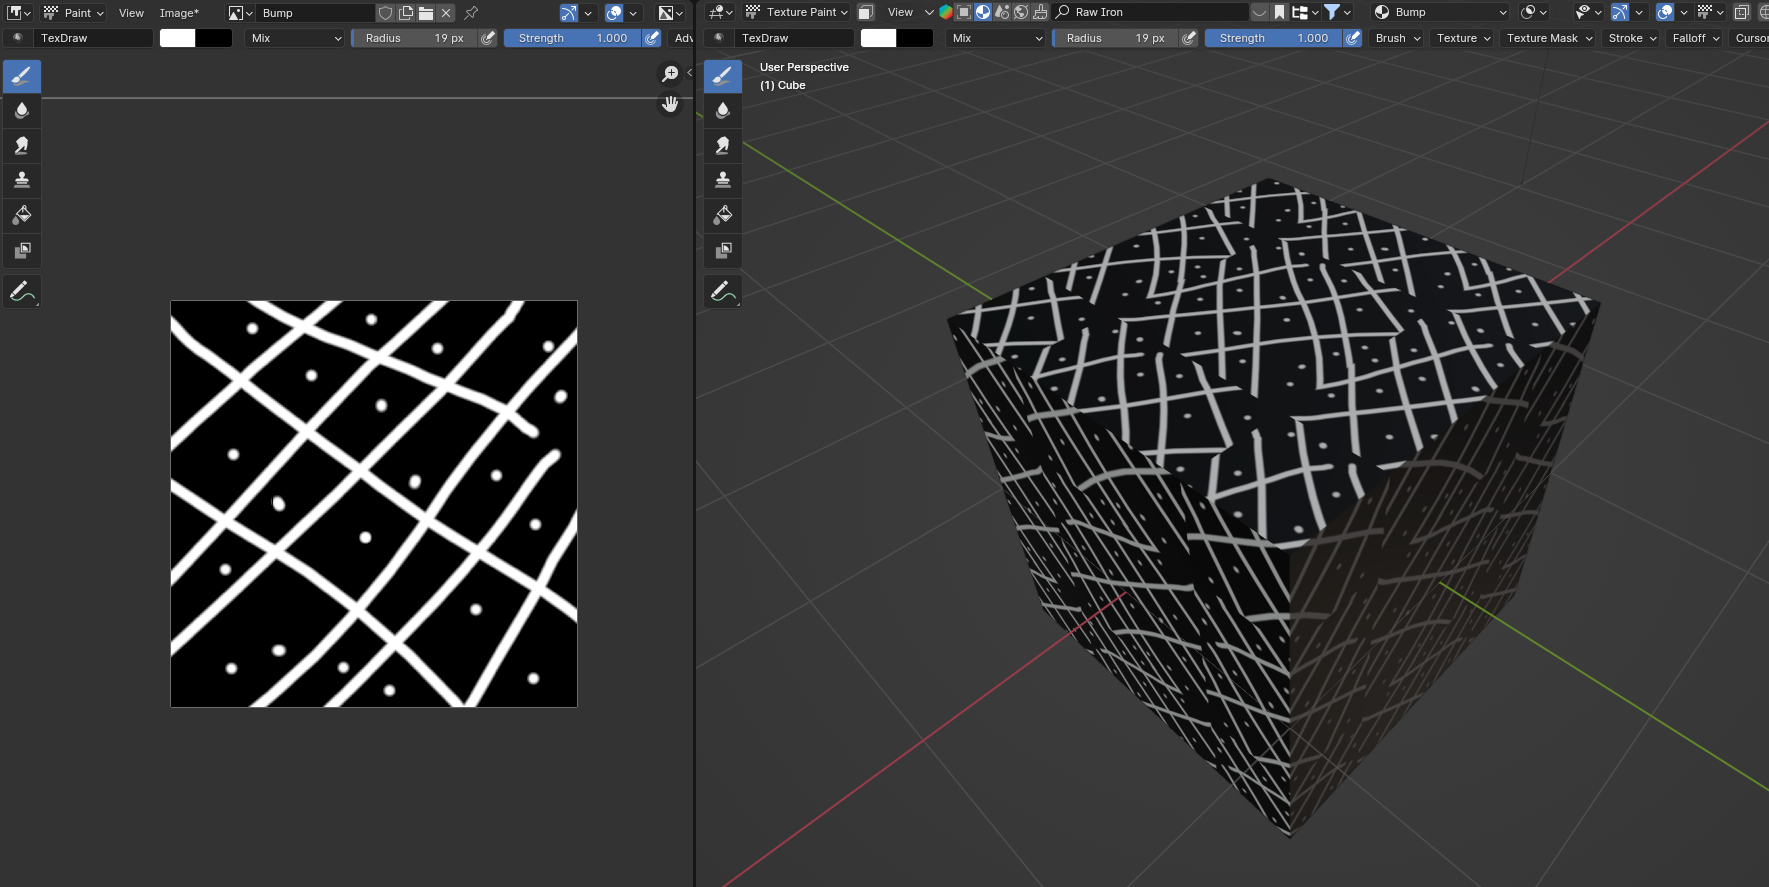
there is a texture calld raw iron in blender kit. pretty simple node structure and 4 different textures.
so we are all aligned, let’s look at the node tree first.
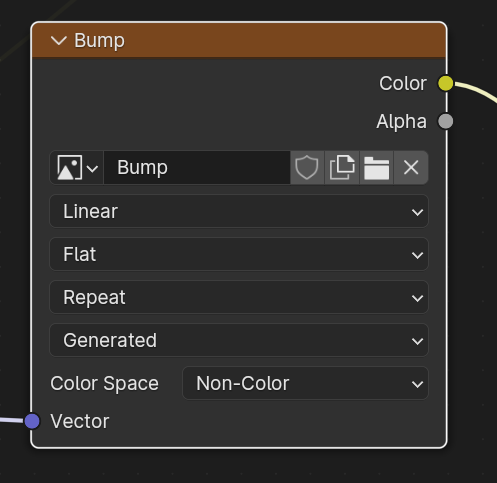
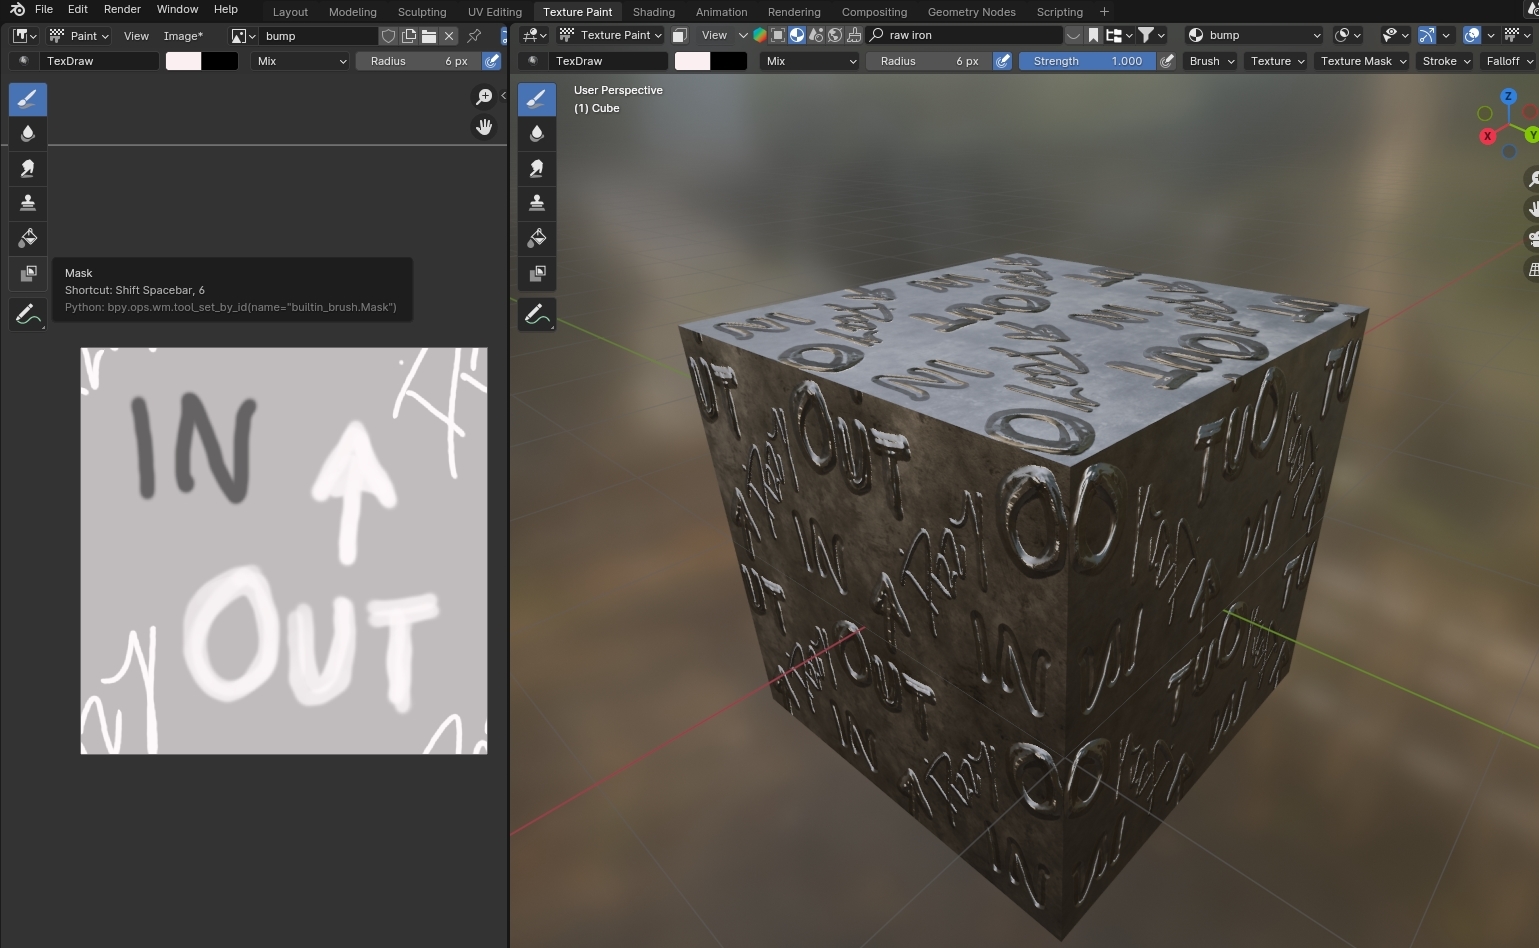
in the node tree we see the colour and roughness metalic and then there is a normal and a displacement thing
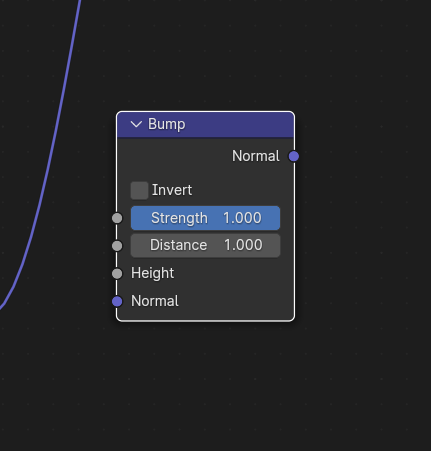
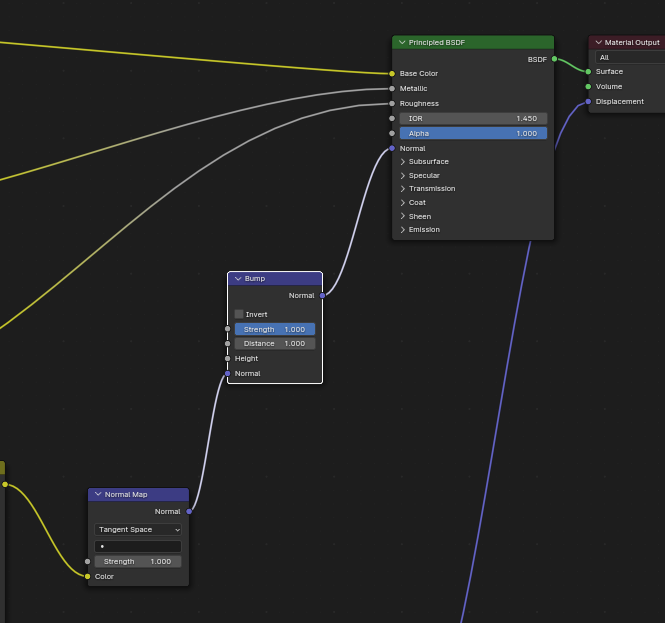
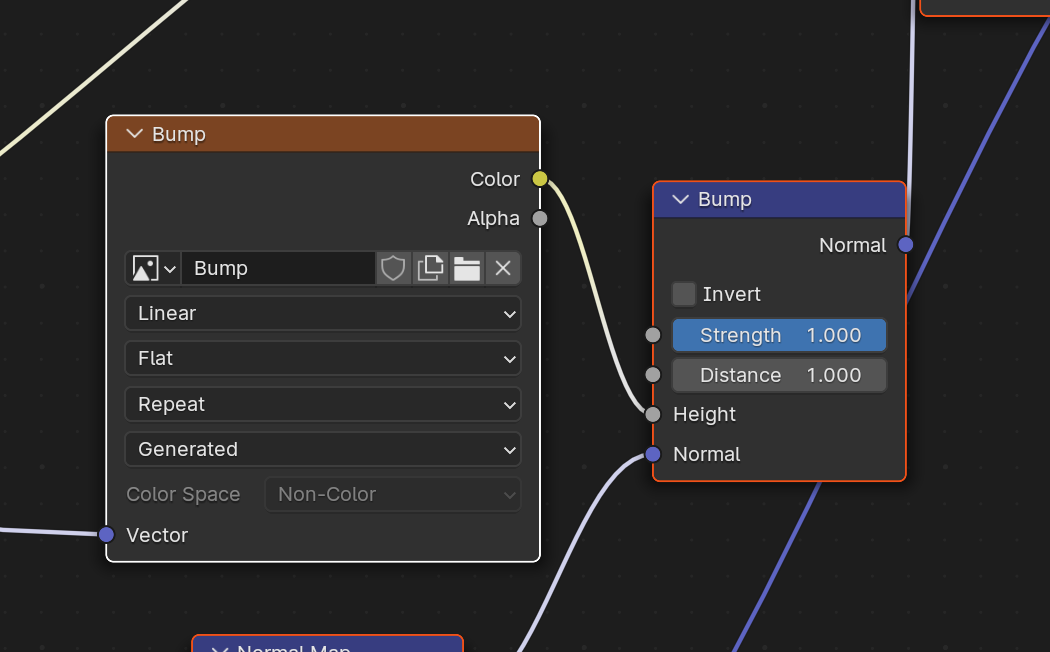
the Displacement is not useful for SL it can be there which is ok but can not be used in SL So what we like to do is to change the Normal map and change how the normal map behave here is one node we can use to add an addition normal map called BUMP
NS: So try to get that to the node system and insert between the normal output of the normal map and the normal input to the principal shader
NS: like this you clcik on add add a node when the first list appear you can type in bump else it is a vector node so Add/Vector/Bump
NS: to search for an operator just clik on the node selector and type
JR: i do shift-a to add, then space takes me to search
NS: Yes
NS: there are unfortunately many strange things in blender still. Space starts animations for me .
Ok we look at the node and there is some input called hight Hight is a gray tone immage that is tranformed into normals
So what we can do now is tomake a texture that will be the bump needed
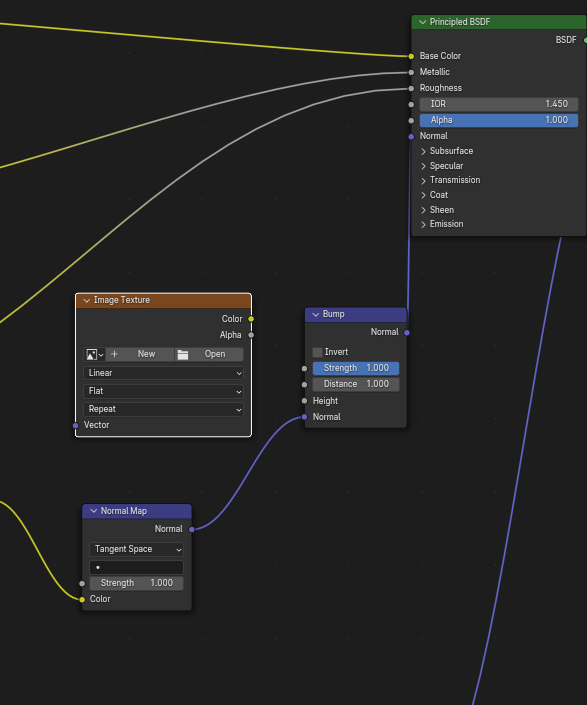
To do that we need first a proper input related to the UV map we use so the textures are aligned. So let us add a Image texture Add / Texture / Image
NS: something like this
So we have to connect that into the node tree The input should be the same scaling as the uther textures they all are fed with a vector input from mapping so we simply connect that to the vector input of the texture and then the colour input goes into the hight of the bump node
JR: wait connect what to what?
NS:
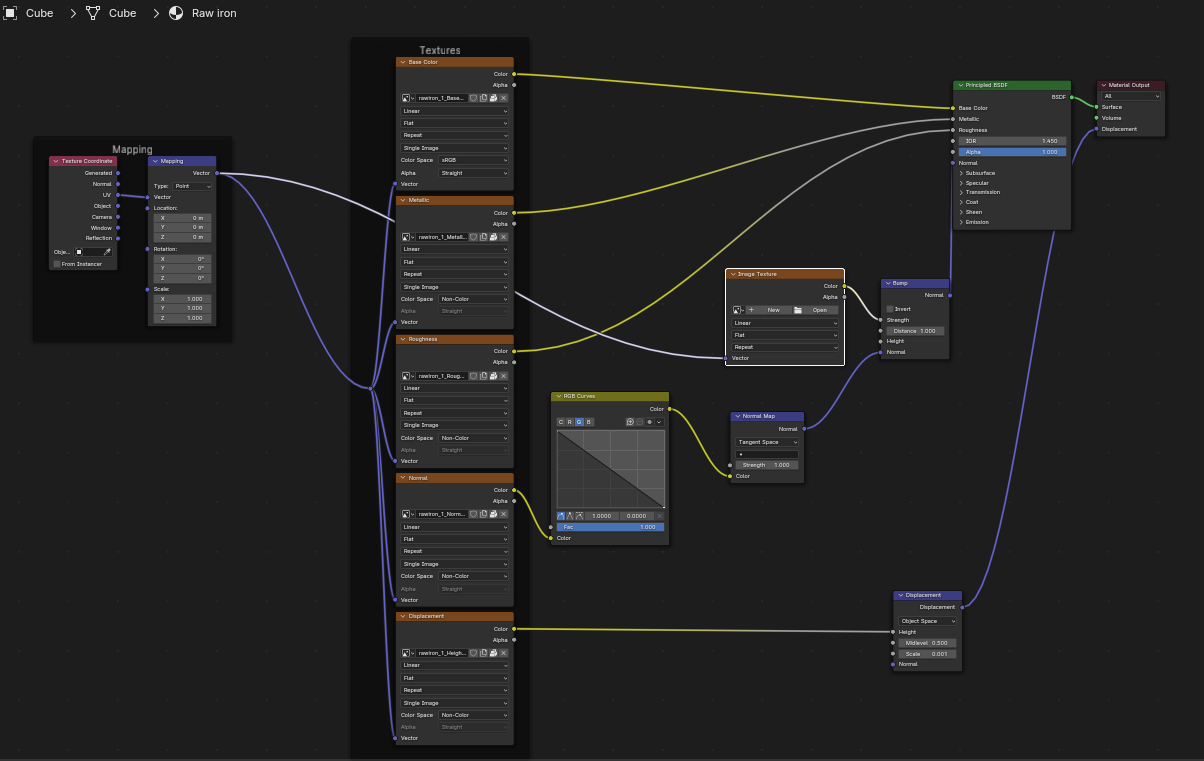
NS: you need an input which is the vector (UV) map intomation and the output goes into the hight of the bump node
DS: color output of image to height of bump
NS: yes So we added a extra layer of normal mapping on top of what was there originally
JR: so this is what, feeding in a blank black texture just now?
NS: Yes next is to make a n actual texture. We are fortunate that the Texture node has a ‘new’ function . So one can click that and then define an image no alfa will be best
JR: size 1024 and blank ok?
NS: yes
NS: and there is a colour setting too: has to be non-colour
Colour Space - non colour ts is how i added a texture i called it bump and i canged the colour Space to non colour
It is hight measurement not a colour
we add to the thing So with this setup we can start to change the Normal map by painting on the texture we added
Sorry for the complexity. But we arr all there. We have a bump node with an associated image and changing gray tones in that chould change the normal map add or subtract from it
DS: so this is useful for rivets?
NS: Yes it is usefull for anything. I will come to all the options
DS: embossing in metal
NS: but here the important thing is the way to add the bumpmap
JR: but no image yet
DS: same here
NS: You should have a black image in the Image display called “bump” maybe if you go to the side panel with is the image display
DS: yes
NS: you should have a pictuure with the name you gave and it si by default black
DS: yes
JR: i see an 8x8 square with no name
NS: ok Janet
DS: i had to find it in the dropdown
NS: yes one need to find it in dropdown
JR: ok that was the secret step, find it in the dropdown.
JR: now i have a black thing, very large
NS: always hidden layers in blender. so we are pretty well off to make the first bump map changes No we have an image and we like to change that in order to do that
JR: ok black square
NS: we need to go to a new setup Called texture Paint “TEXTURE PAINT Before we do the next step
it is cruciial that we have selected the image we like to change
So you have to click in the node tree on the bump map image so it get a highlighted border
then when you go to texture paint that is the image you work on
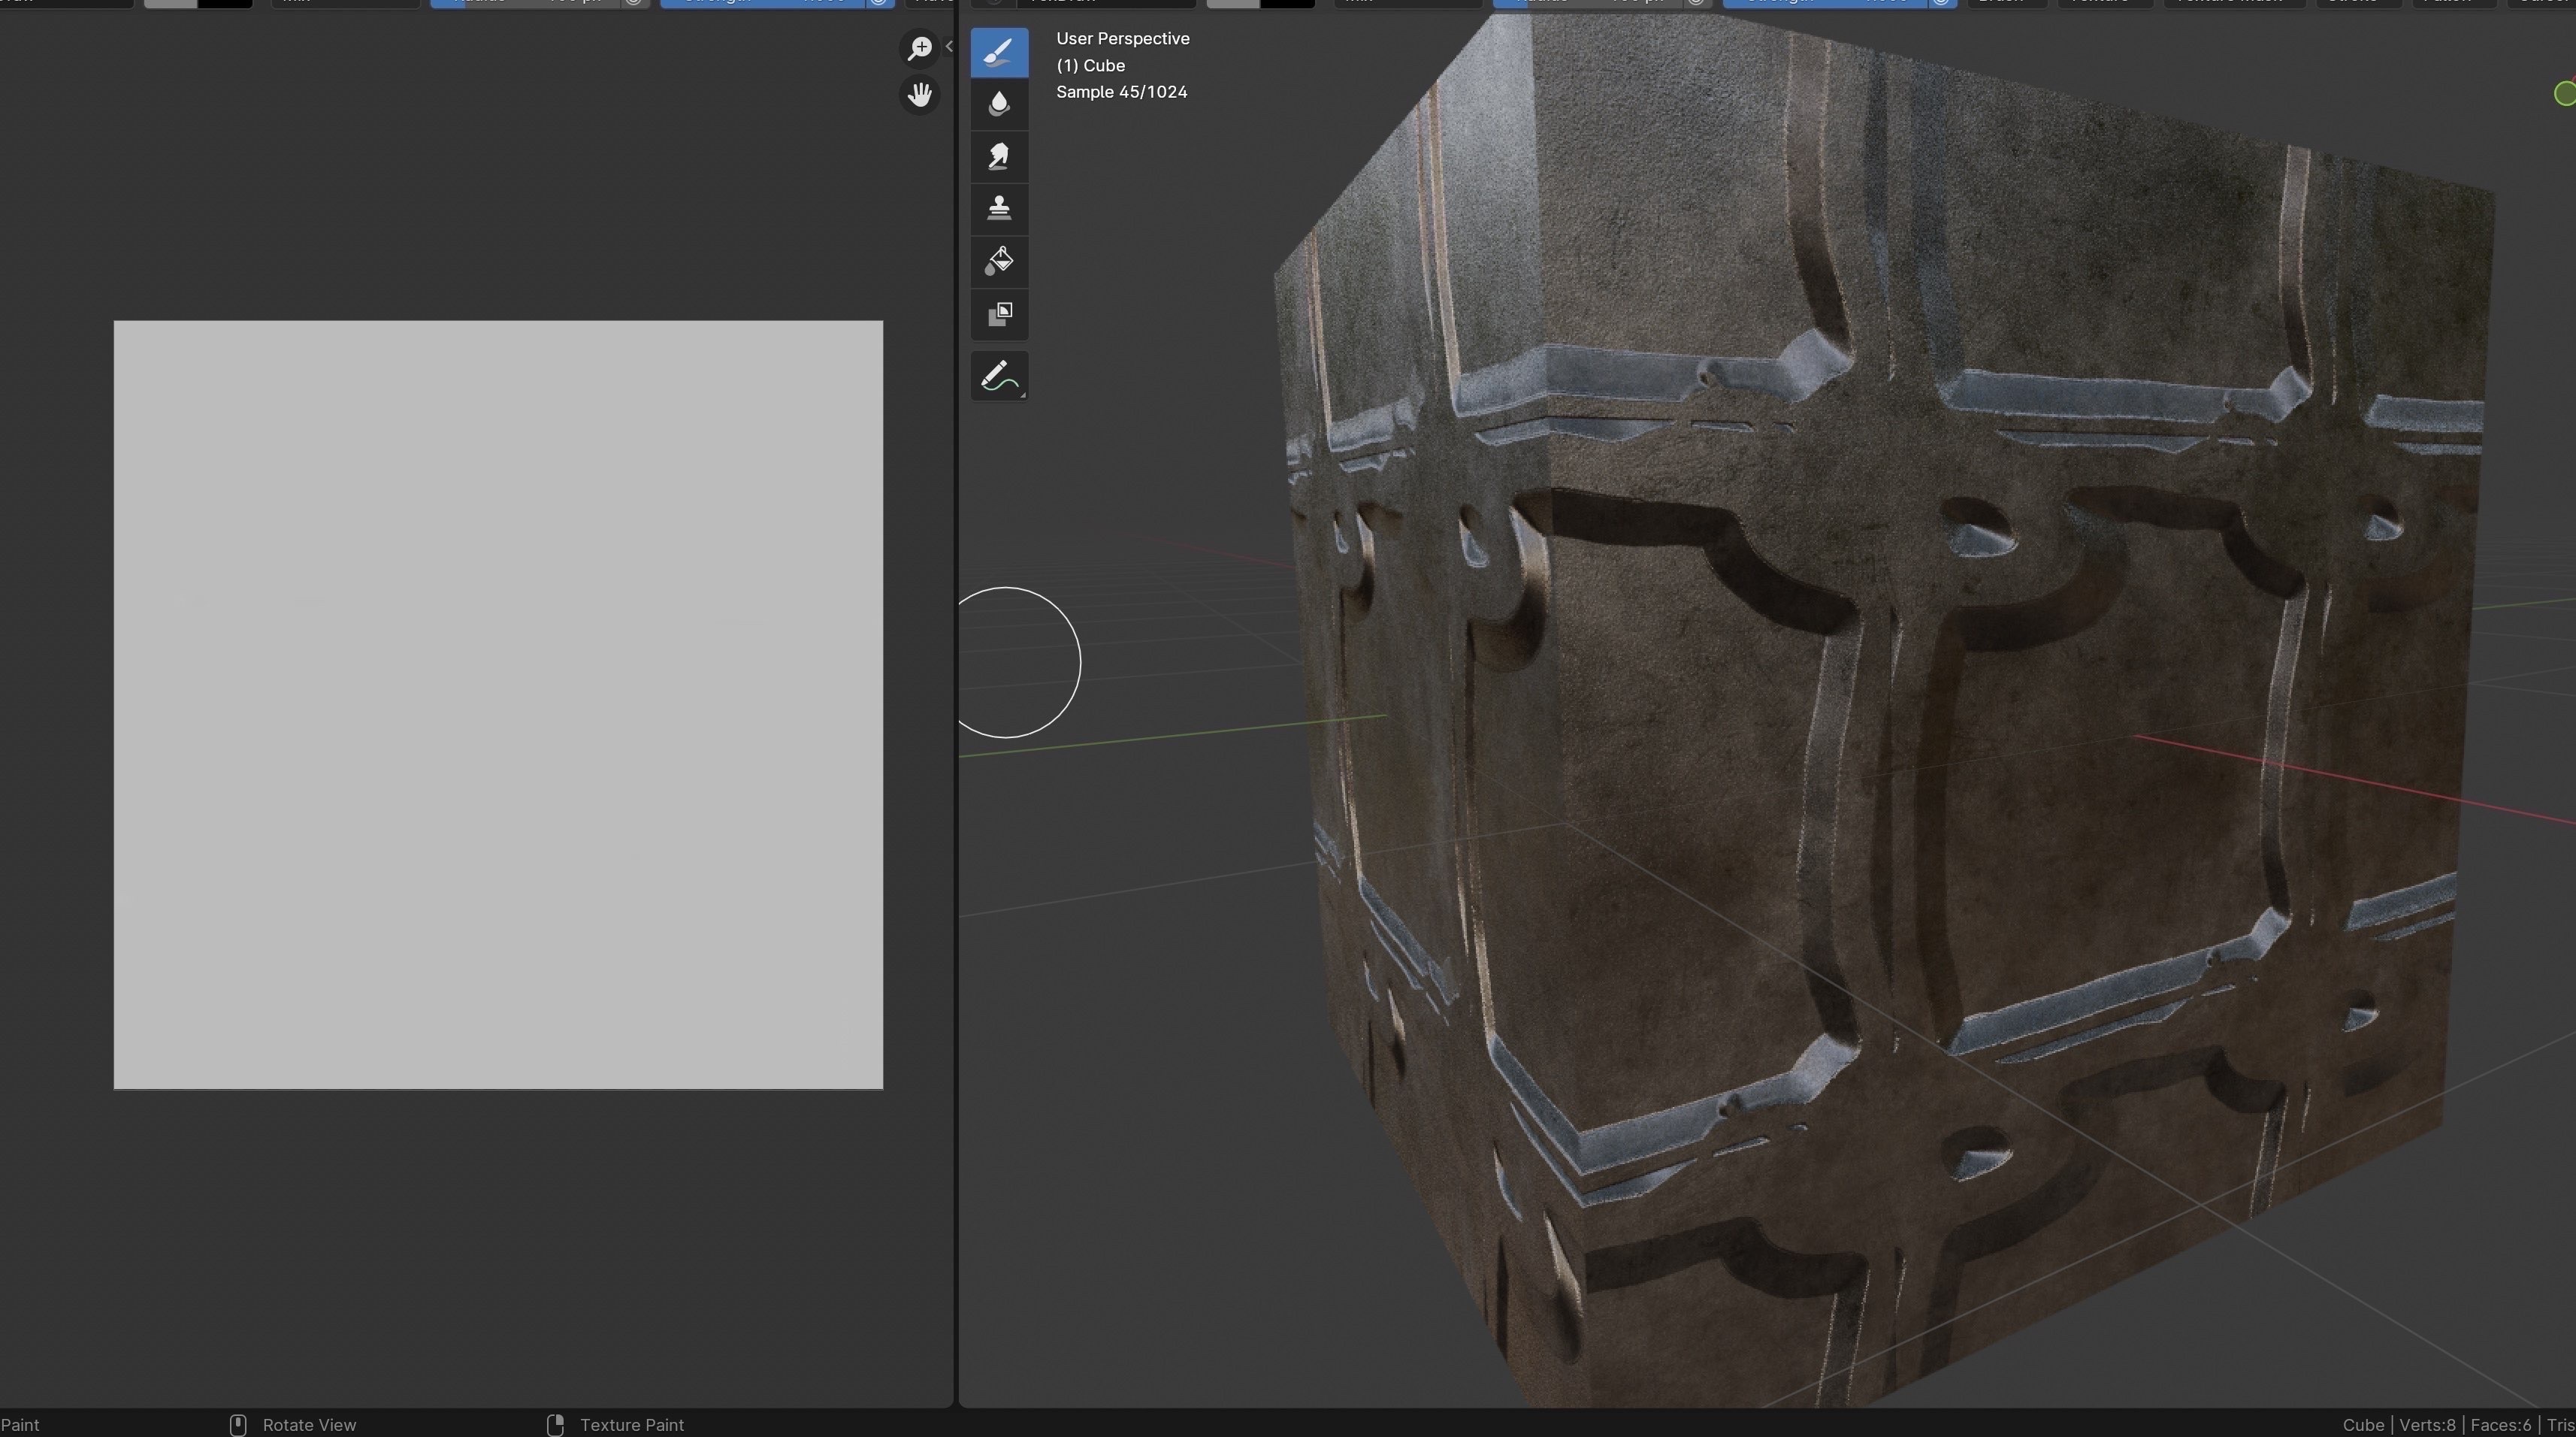
Ok so my window looks like this

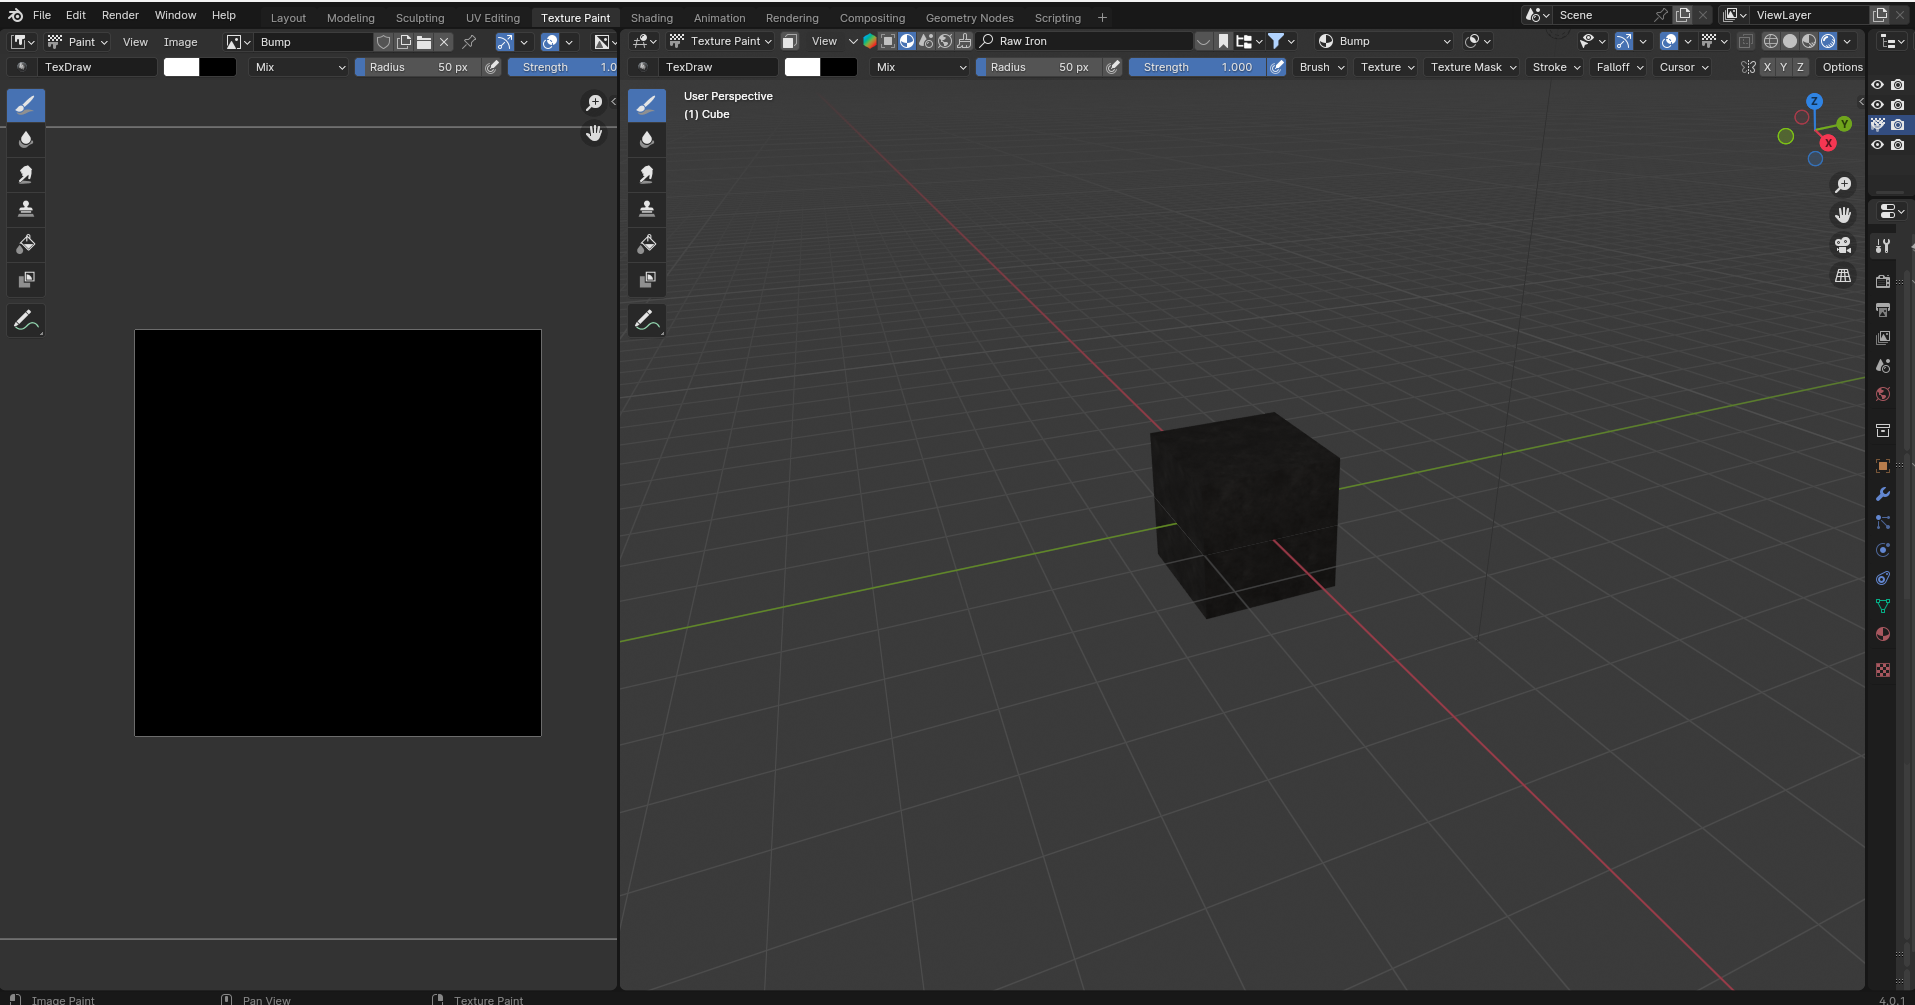
NS: we have a image display and we have the cube one can change the way ti is shown using the icon inthe upper right corner as in the model window show ti as a mesh or with fidderent textures the best here is to show in full render

DS: ok i i had to open the veiwport wide to see that
NS: yes some might be hidden So now we are in a texture draw mode
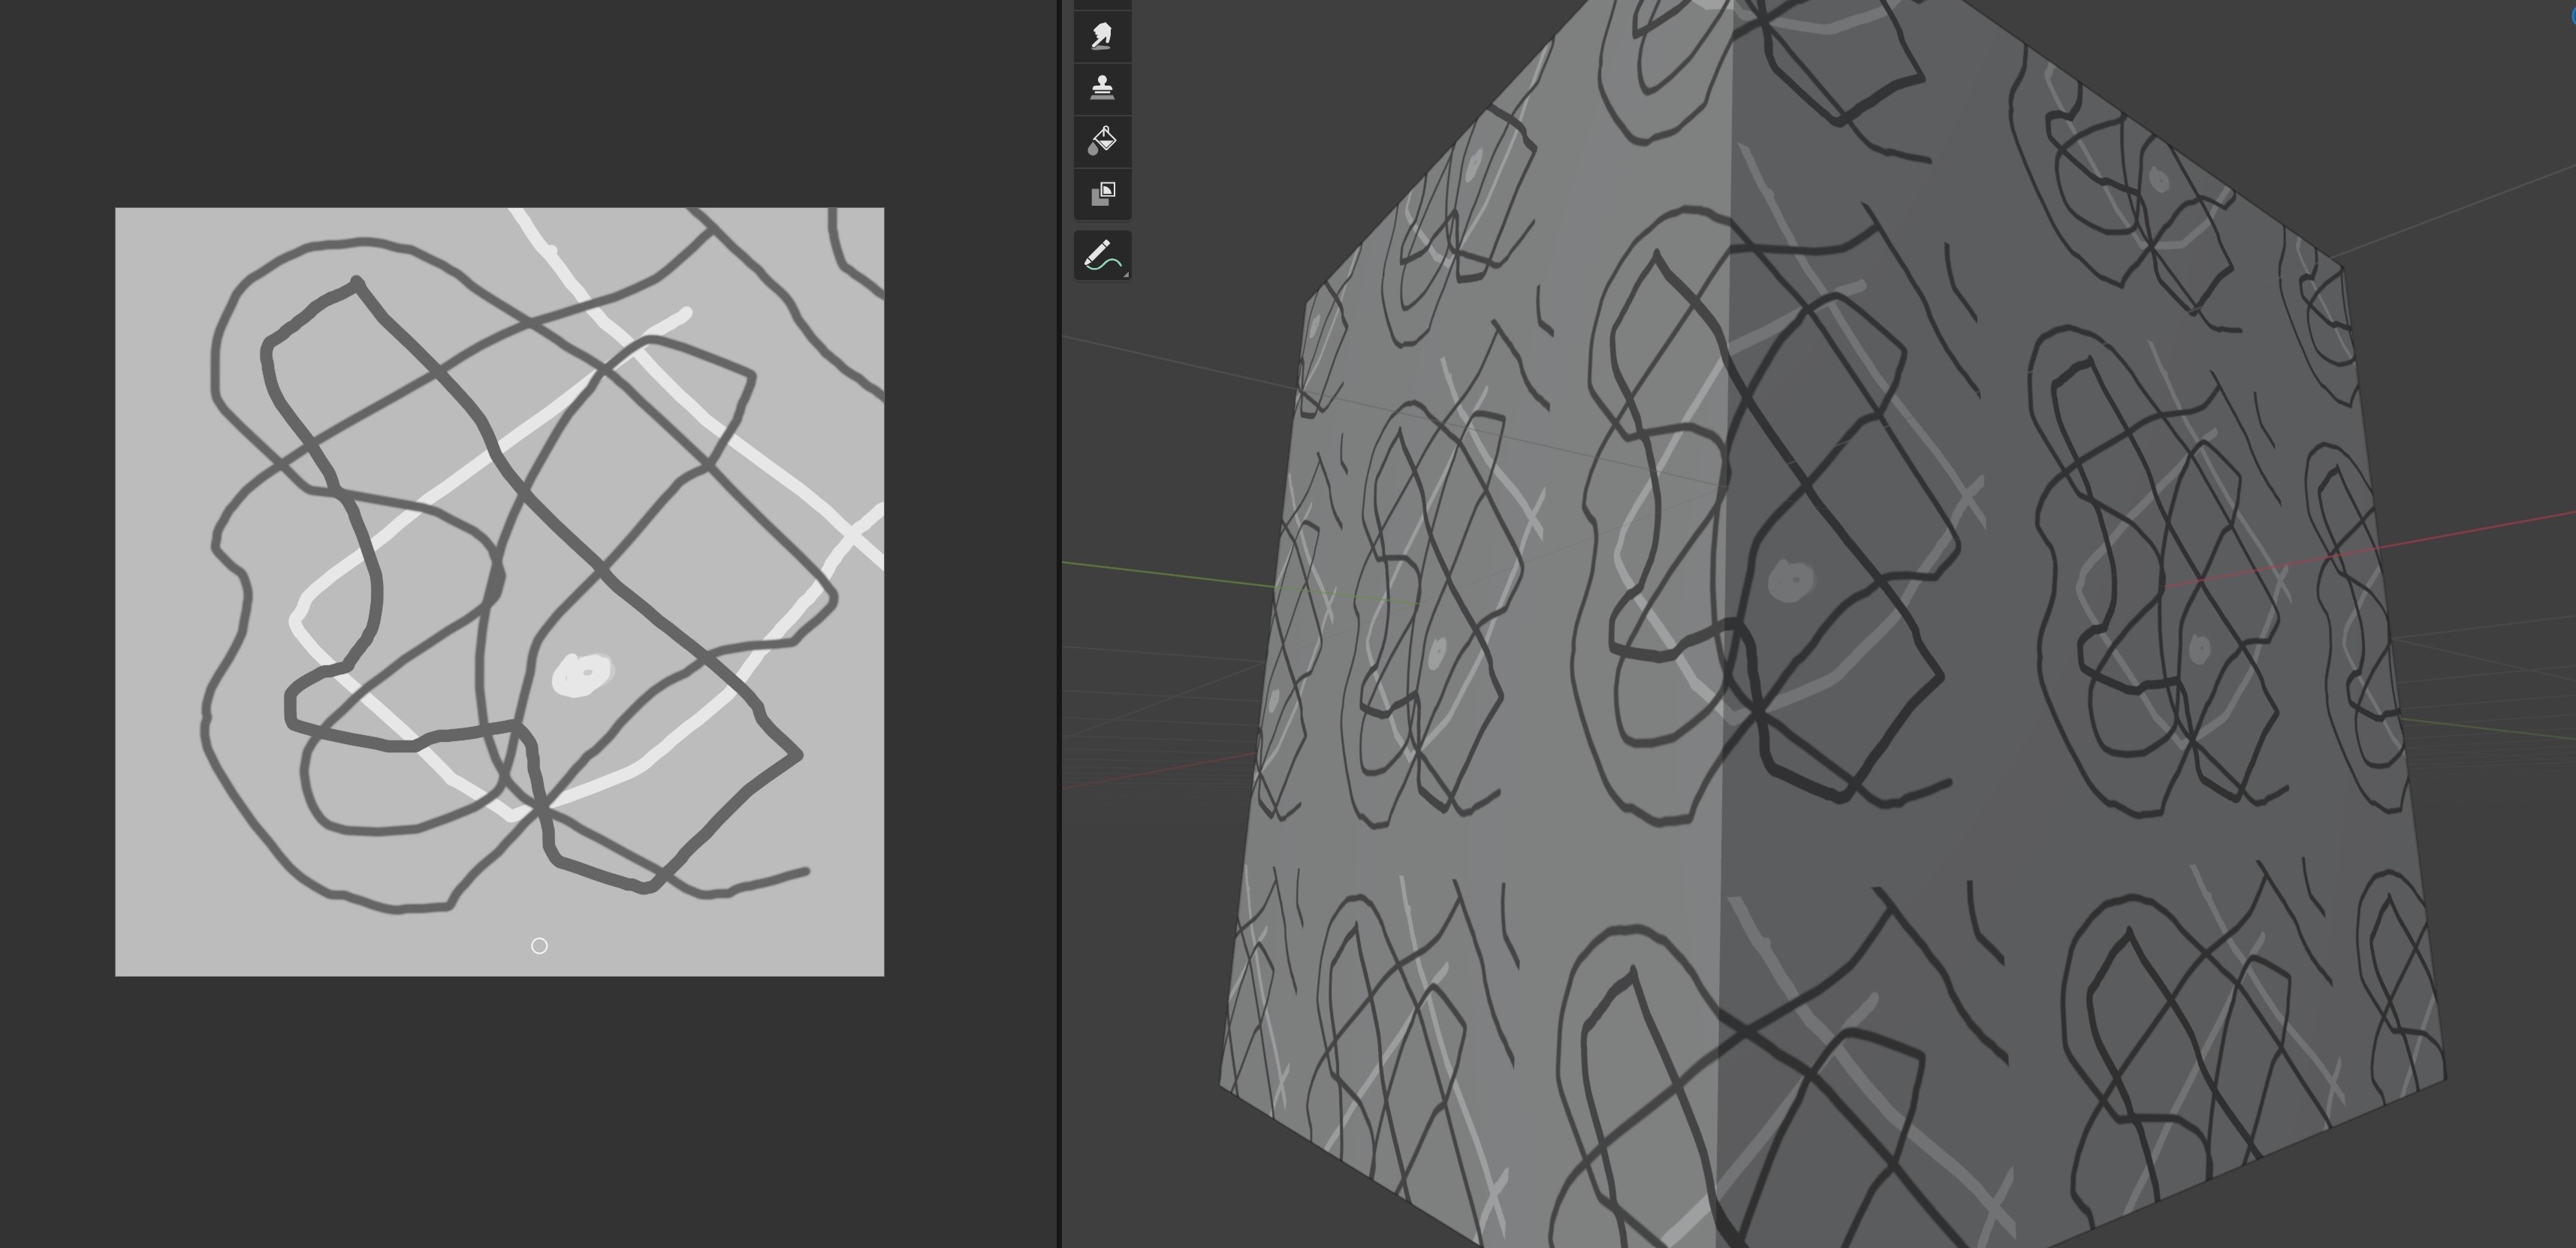
and in the texture panel one can draw as example some white line
So if one plays with the Display on can switch between different modes
We adjust the texture or the full render
DS: hehe
NS: (#11)
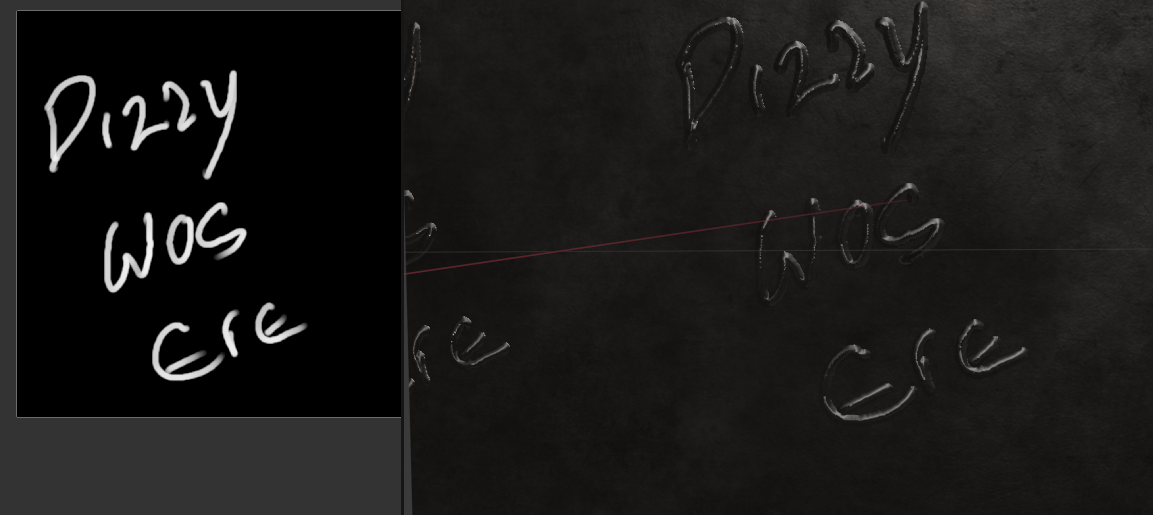
NS: my thing in texture mode and we can see the UV is repeated many times
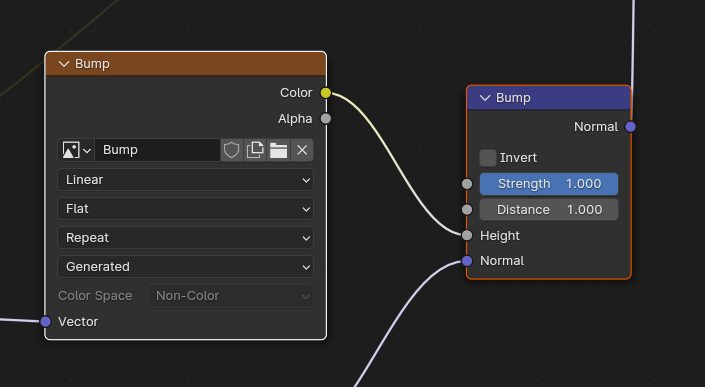
I think i made amistake mistake int he node tree
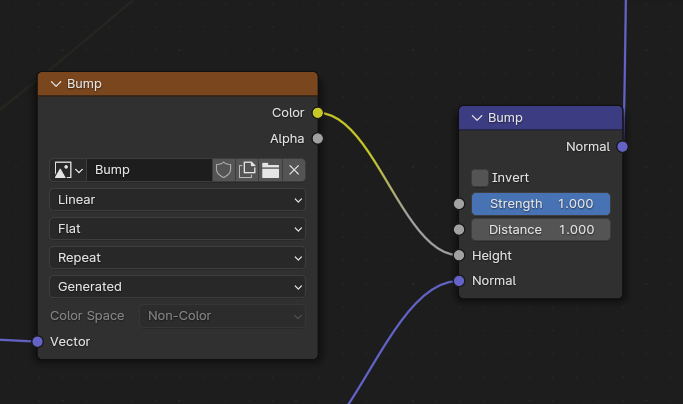
NS: the bump map picture has to be inputted to the hight like shown here Sorry (mistakes happens) in the end
JR: ah yes much better
NS: we should see something like this
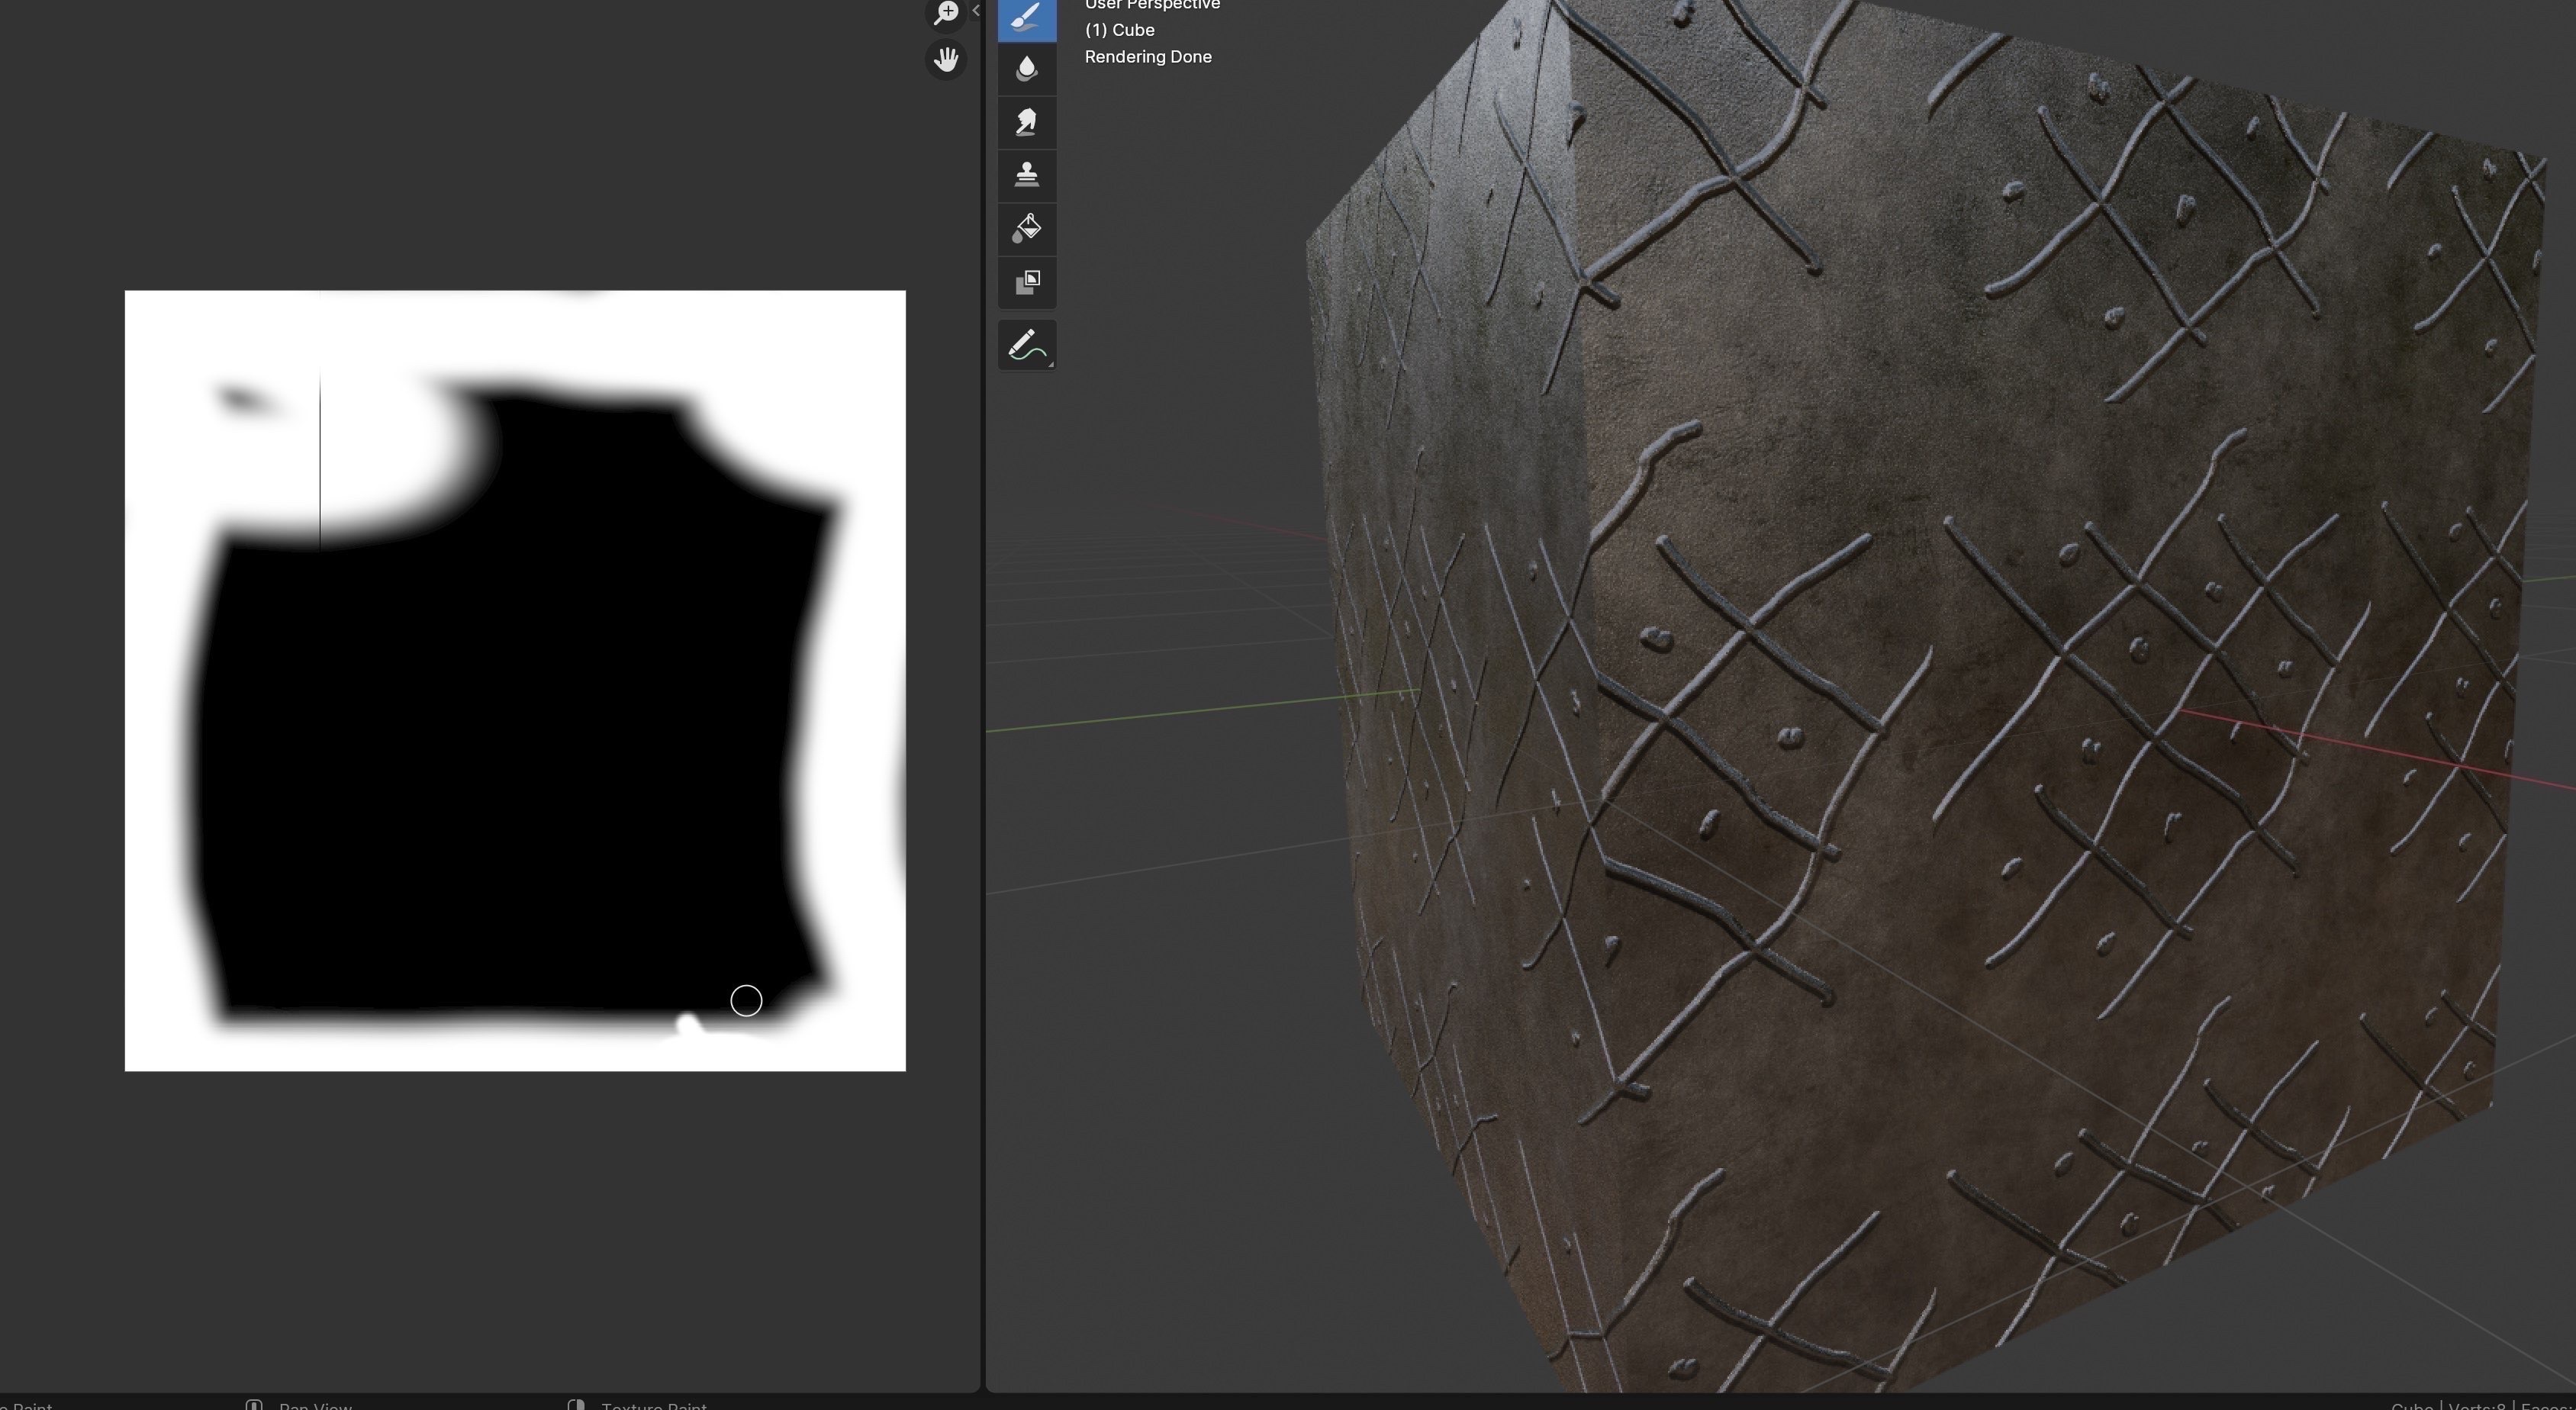
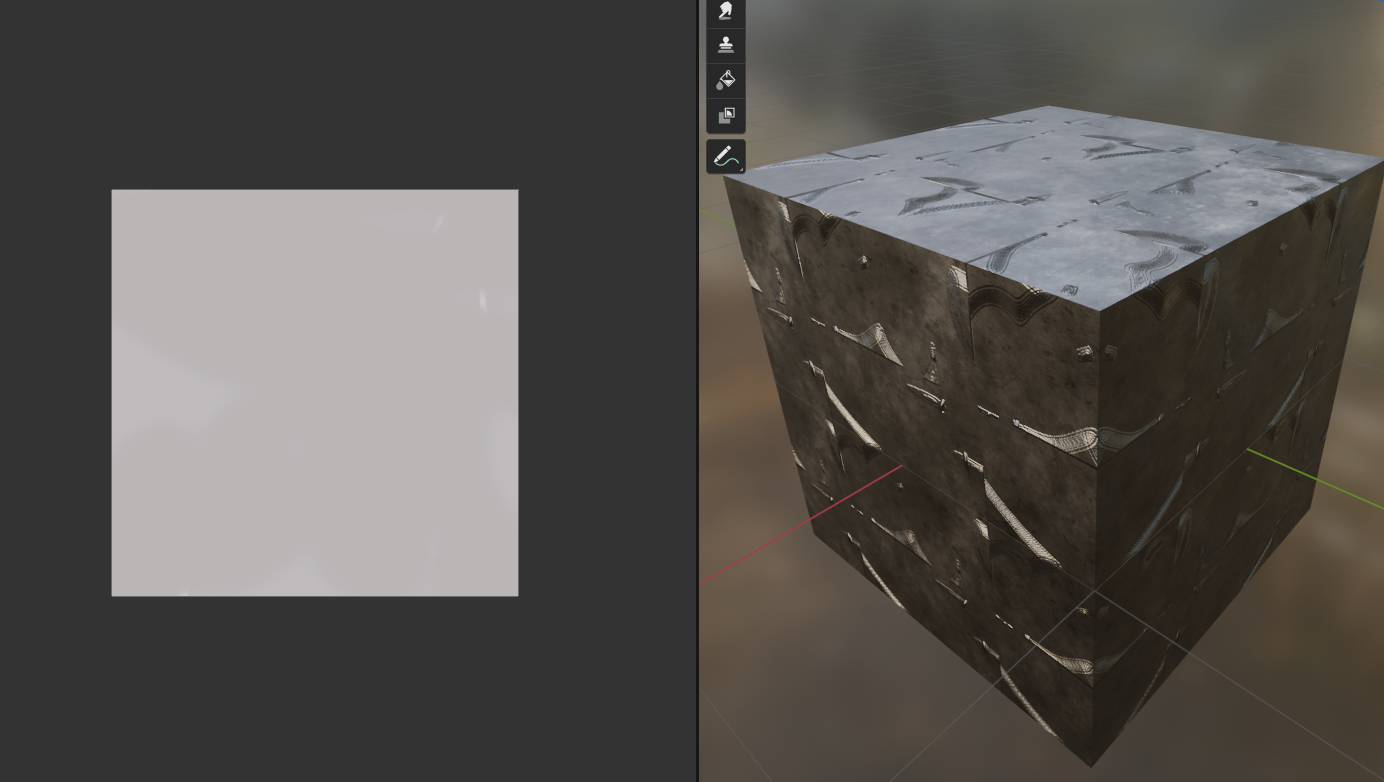
DS: i made a mistake and connected it
NS: good Dizzi Also make more sence sense so we see anythign we draw on the picture is nor refleced in a change fo the normal map So Now we need to knwo abit of how th e bump map are jandeled handeled gray 128 is no change and more white is up darker is down So the normal way to do a bump map is to make it uniform gray and the add hight or dept so just colour pick a mid gray tome and
DS: so set grey and a big brush and paint it all?
NS: then paint the picture with a huge brush make it all gray
JR: i have a question
NS: yes Yes Janet ?
JR: i was drawing in white, as i think you were, and got the pattern on the cube as you had (I think)
NS: yes
JR: then i tried to erase it and painted all in black …
NS: yes
JR: and the pattern does not go away even tho the texture looks black
NS: and it vanished
DS: it seems to paint in multiply. i had to go over several times
JR: ah blending mode
DS: had to go over 10 times
NS: it is like photoshop with diferent way to mic brushes
DS: yes it was in mix
NS: mix
DS: yes i understand that
NS: I think the main thign here is one can get to the texture paint and get the right texture selected and actually see how one cange the bumpmap
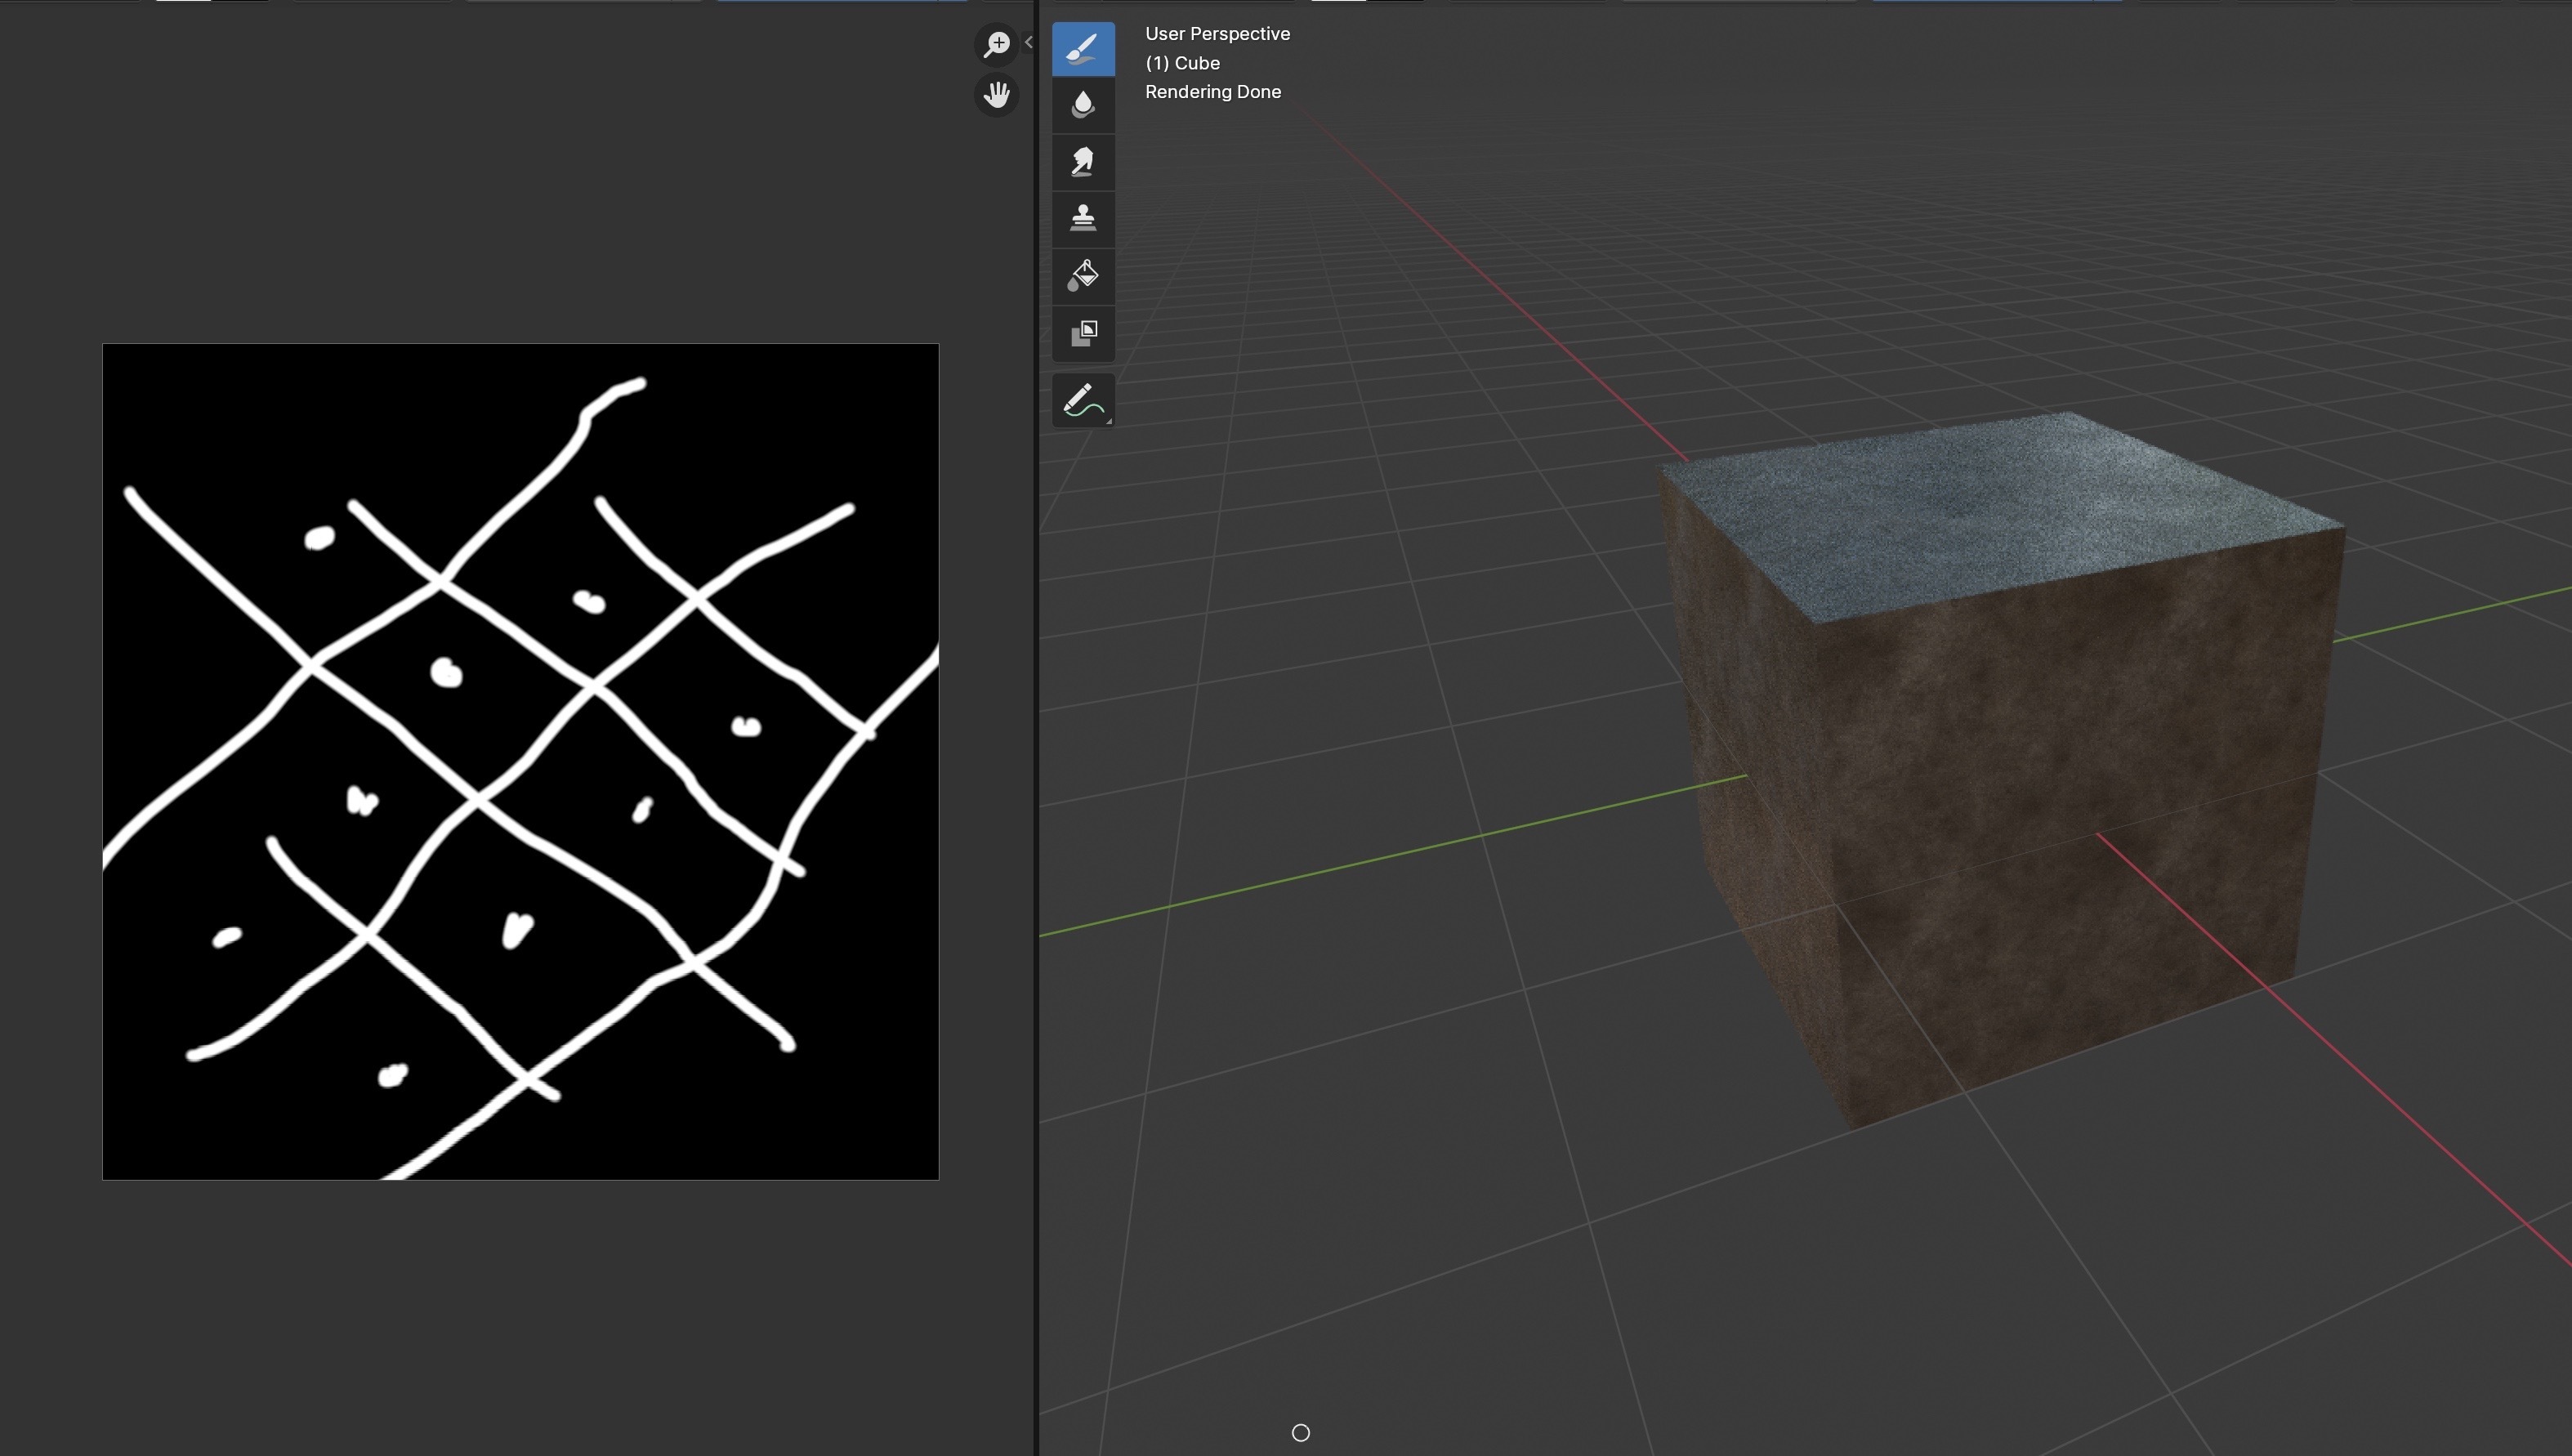
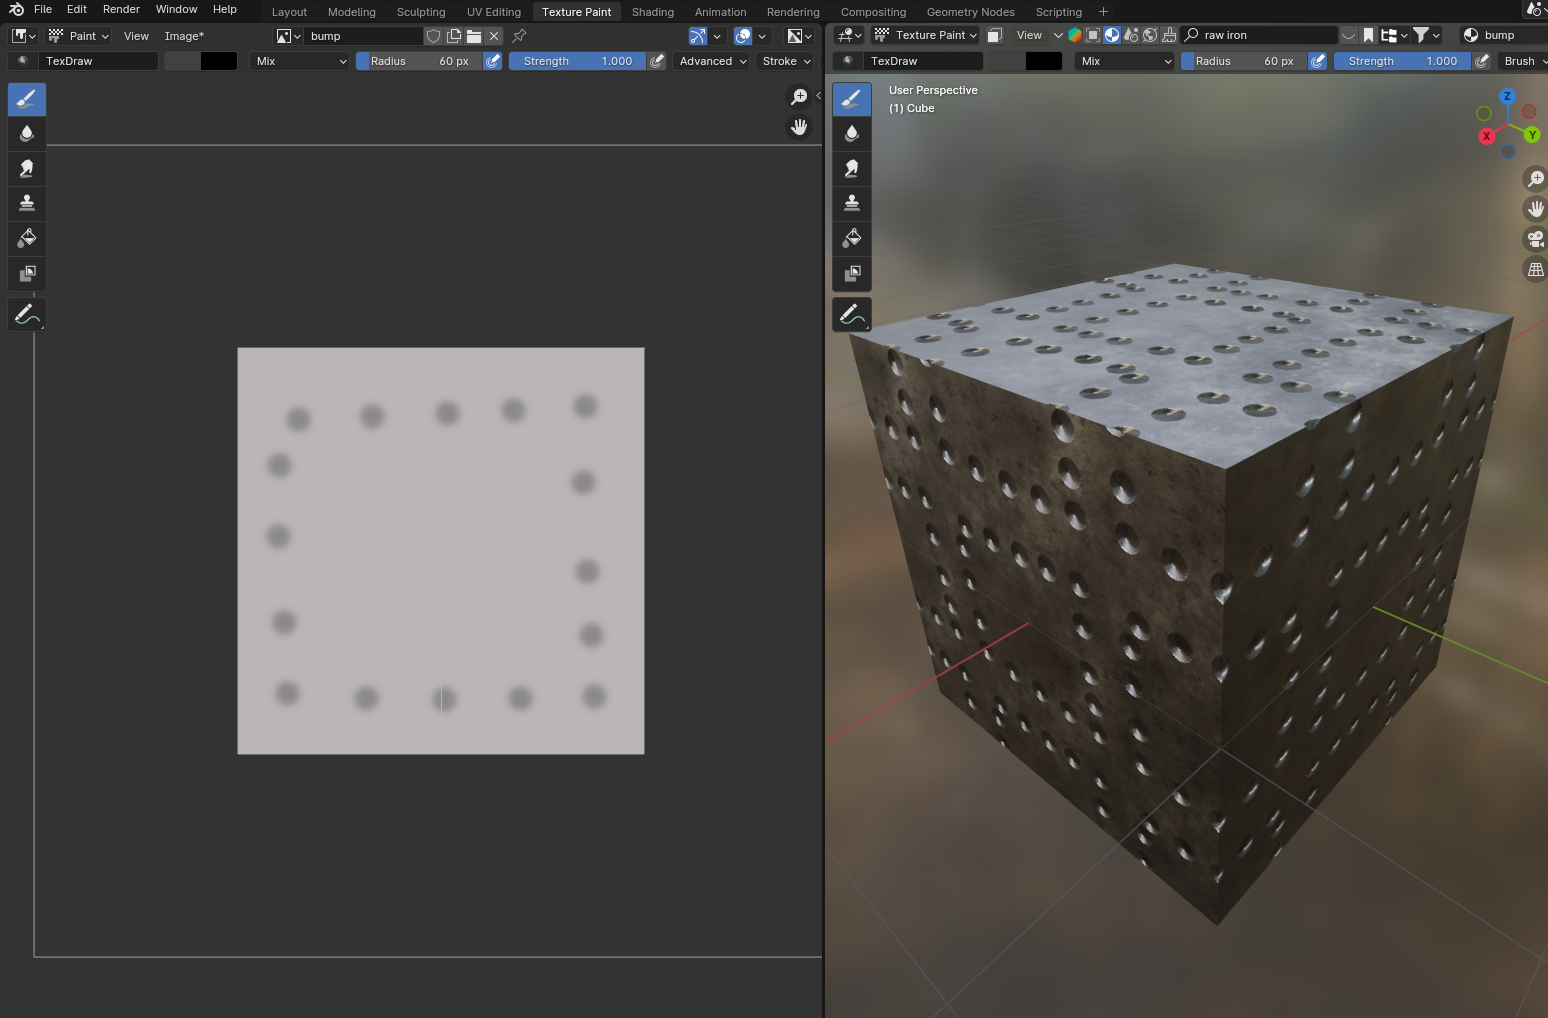
But we are not done b ecause we have even more poverful tools here. One can draw on the cube directly too and it wil change the image selected and nothing else . So if we all make the image grayish
JR: nothing i do affects the cube
NS: Ok Janet So did you fix the little thing with the node tree
JR: yes and i have the crosshatch but that is now all i can get even if i paint more
NS: colout input from the texture has to go into the hght
JR: (needs jpg?)
NS: Ok so go back to the node tree ok that might be ok Janet try to make a unifor colour in grqay all over the image
JR:
NS: nodes are fine so if w e get the image in a gray tone unifor all hight changes should vanish
JR: now it did this
NS: smiles are yo sure you ahve the right image selected int he texture paint there si something makign bumps
- Note
- Clicking back and forth between layouts seems to cause a refresh. Somehow my Mac Blender does not always refresh. Saving the image also refreshes.
DS: try going over the area a few times
DS: it took 10 passes for me to flatten it
NS: set the strength to 100 of the brush
DS: and i could not see the lines in the texture
JR: max strength is 10
DS: maybe why i had to pass over 10 times
NS: For now no not change the node settings janet
JR: i am not changing any node settings
NS: can you give us a picture fo the full screen
DS: its the brush
NS: so we can see the selections meny bars
JR:

DS: set the radius large and scrubb the area a lot down to grey and watch the stuff in the 3d window see it the scratches get less
NS: An other thing might to try to save the bump image
DS: i had to scrub the window 10 times before the brush cleaned the previos
JR: i have been scrubbing and scrubbing
DS: ok
NS: Try to save the Bump immage to the drive
JR: how does one do that
NS: Sometimes bender do not update if there is not file to save to Click in the minu on image and save or save as
JR: k done
JR: that cleared it
JR: sheesh
NS: yes sorry ti is a old Blender problem
JR: sorry for the delay.
DS: np
NS: took me tons of frustration
DS: explains why it happened here too
NS: and headace to find what i lost But we gt a logn way we have a texture with can be a bump map and can paint on that Next
DS:
NS: Now we have cleared the bump map we can go the the image display window and then draw dirctly on the cube
DS: yes
NS: wotks the same waqy way
DS: :)
NS: and one can add doth and critical thign to the 3d model
JR: bah
JR: now it is stuck flat
NS: yes so you got all flat again janet then try to so to the model window and use the brudh there
JR: and nothing i draw in the square or on the cube makes any difference
JR: whether i draw in black or white
NS: mmmmmmmmmmm
DS: what colour pen?
DS: ok
NS: ok that is odd
JR: ok i saved the file andn reopened ad now:
DS: and worked?
NS: Ok it should be dynamic
JR: oh wait not in cycles
DS: im in evee
NS: ok that may explain
DS: cycles i think
DS: i forgot
NS: yes try cucles Eevee should show bump map too though
JR: now i have this:
DS: it did
NS: ok that is fine Janet then you have to select a better display it is the icons in the upper corner
JR: yes it lost that setting
NS: whare you select between mesh faces texture or full render
DS: yes was like this
NS:
NS: you can swith to see the textur onthe onject or the render of all you see the texture directly
NS: Actually i think it works best in eeevee EEVEE
DS: yes its less grainy
NS: yes and faster update of the bump But we need to get Janet in line
JR: again i cannot draw
NS: Ok Save the file close the all then reopen you should get back to whare you are
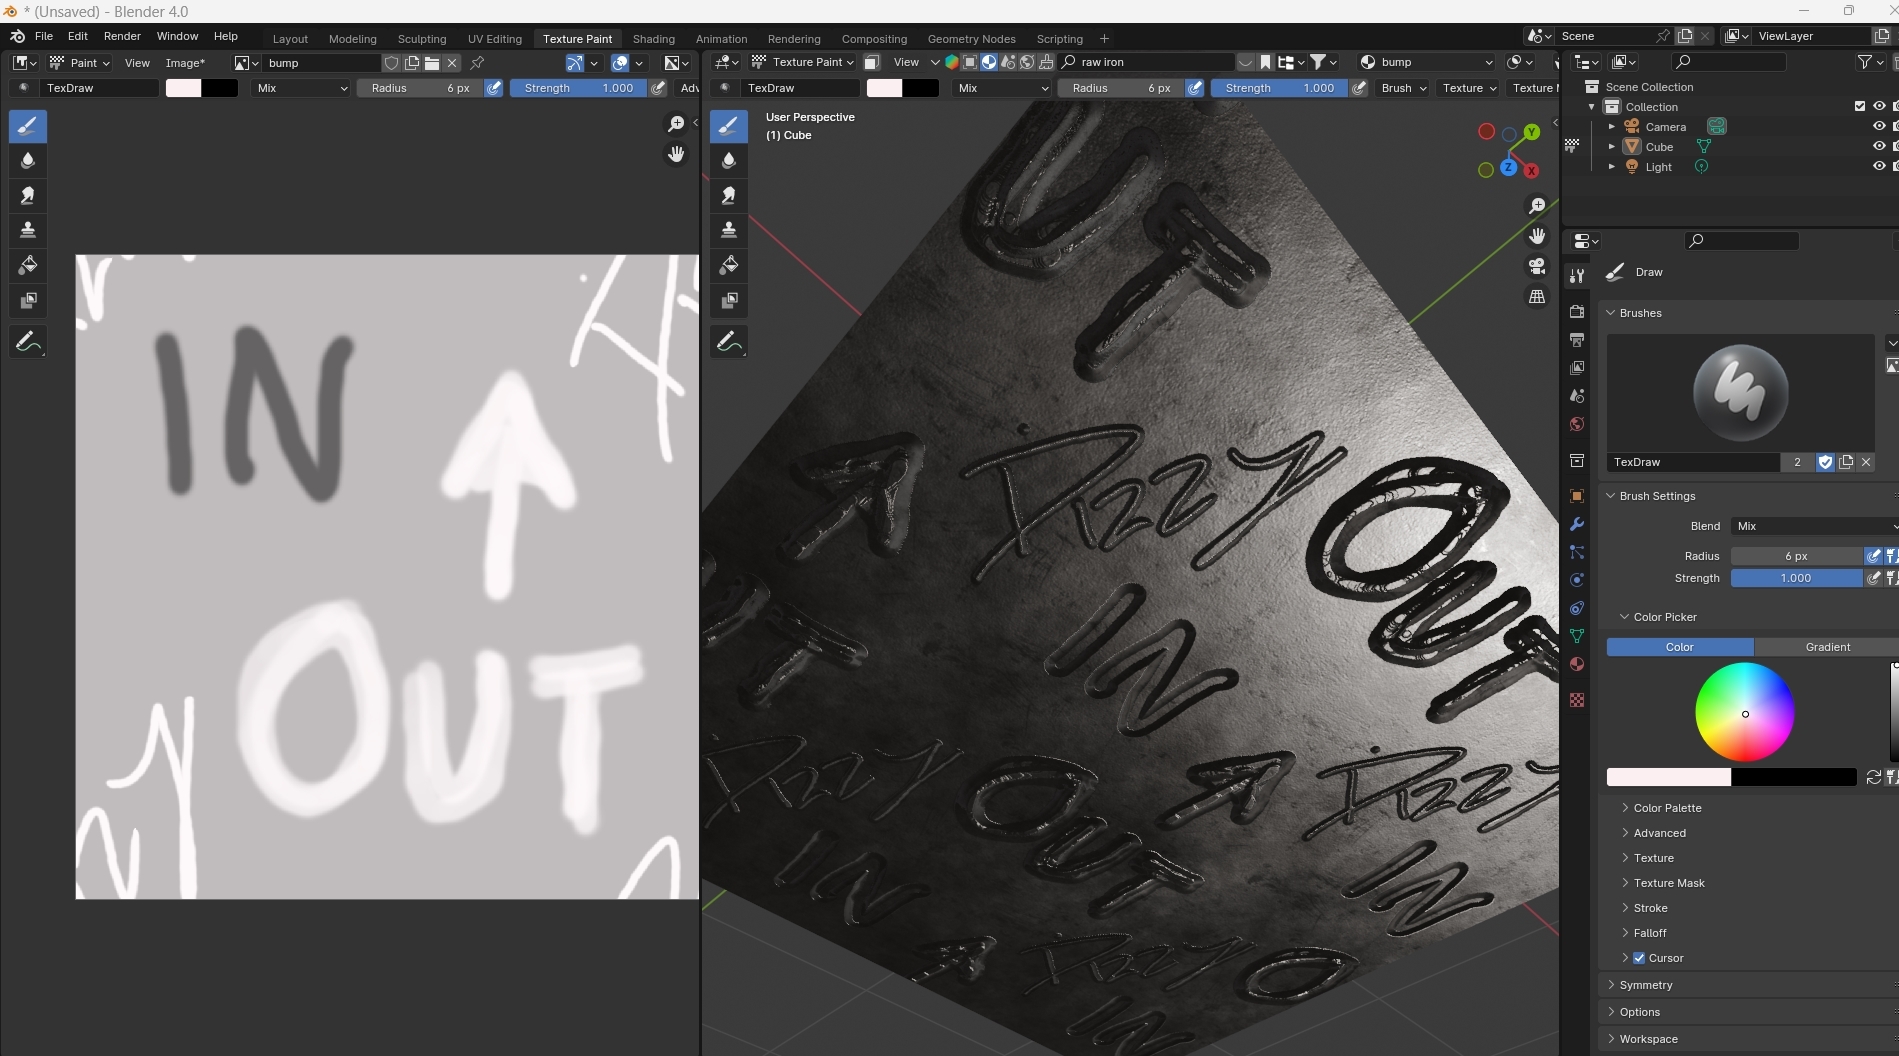
DS: yes but you could draw this externally in Procreate or PS
JR: i yes but still cannot draw on the image or cube
DS: ok
DS: i see
NS: So try to close it Janet something got stuck
JR: closed and reopened blender still nothing
NS: then reopen the blender file whispers: and you can not draw ont he image ????
JR: i can draw in white on gray but not black
DS: these are my brush settings

NS: Shoud draw thing white lines thin white lines
DS: yes
DS: it does
JR: it’s sort of working now
JR: no idea what changed
DS: yes?
JR: anyway i think i understand up to now what should be possible
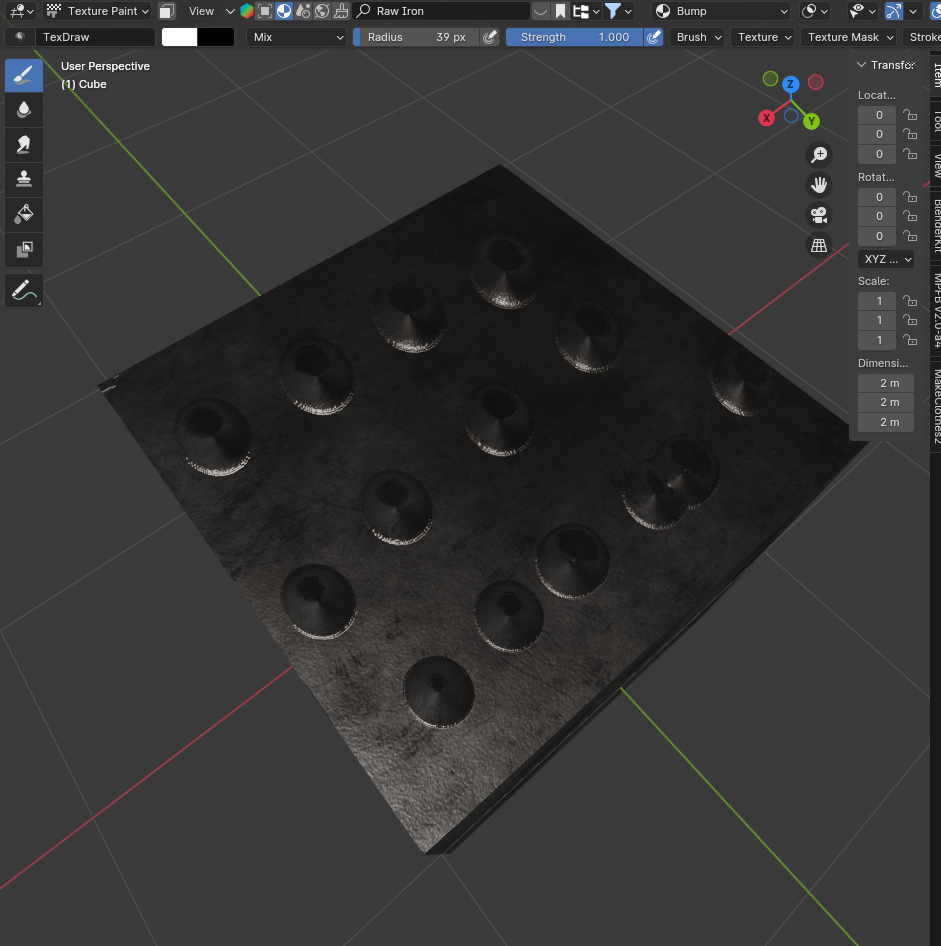
NS: Ok so we have to align again we all make the immage a gray tone and bump should vanish then we can go to the model window and try t make bump by direct draw ont he cube make some dots around something like this NS:
NS: it should change the image relecting the change reflecting the changes You got that ?
JR: yes i managed to get something like rivets. but you have to paint a lot to get it flat again. perhaps best to start with new textures
NS: Smiles Ok Janet as long we have some dots
DS: yes im seeing same sort of stuff, why not make a texture in 128 grey and load it before scrawling on it
NS: one can do that it takes me 2 strokes to go gray make a brush 1000 pt
DS: ok
NS: and then 1000 percent
DS:
NS: and it delete all
DS: where is the 1000% ?
NS: Sorry strength 10000 1.0000
DS: ok
NS: full strength and mix overwrite what is there
DS: yes
NS: We all have dots Janet you got some
DS: ill try wiping what i have clean then
NS: Ok Dizzi
JR: now i can draw in the texture and not on the cube. wtf.
NS: then save texture janet
DS: wiped clean still bumpy
NS: yes it is nto clean Dizzi But before we all get totally frustrated
DS: took 5 passes
DS: yes
NS: Please make some dots of some kind
DS: ok
NS: and tell me if you have
DS:
NS: good Dizzi
JR:
NS: good Janet Ok
DS: :)
NS: The strength of the bumpmap
JR: i think i get the idea but i have no clue why it works sometimes and not others
NS: the power how ti is displayed is determined int he node tree and that si important to know that once can change the strength we run on a huge amplification so we go back to the shader editir editor find the bump node and notice there is a strength setting it is by default set to 1.000
DS: yes
NS: not try to change to 0.1 reduce by 10 times the strength
JR: ah it is range 0-1
DS:

NS: yes and one can tyne the effect of the bumpmap sliding it up and down one can also play with the distance it is usuallt set to 1 and keept fixed
DS: what does it do?
NS: usually it compress the information in the bumpmap picture if the strength is 1
DS: ok
NS: light gray is already out of range and Black is out of range so you get jetky bumpmaps with flat tops and growes
DS: ok
NS: So one have to tune the bumpmap into a proper range It also means
DS: so leave at 1?
NS: one are more free to draw the bumpmap
JR: i suppose there is some way to create more than one and use them?
NS: Strength is about 0.1 - 0.3 maybe Distance keep on 1
DS: ok
NS: Ok so what we have now is some controll of how a bumpmap will affect the model
JR: yes, and i crave a break :)
JR: but i think i mostly get the idea
NS: Yes janet Lol
DS: :)
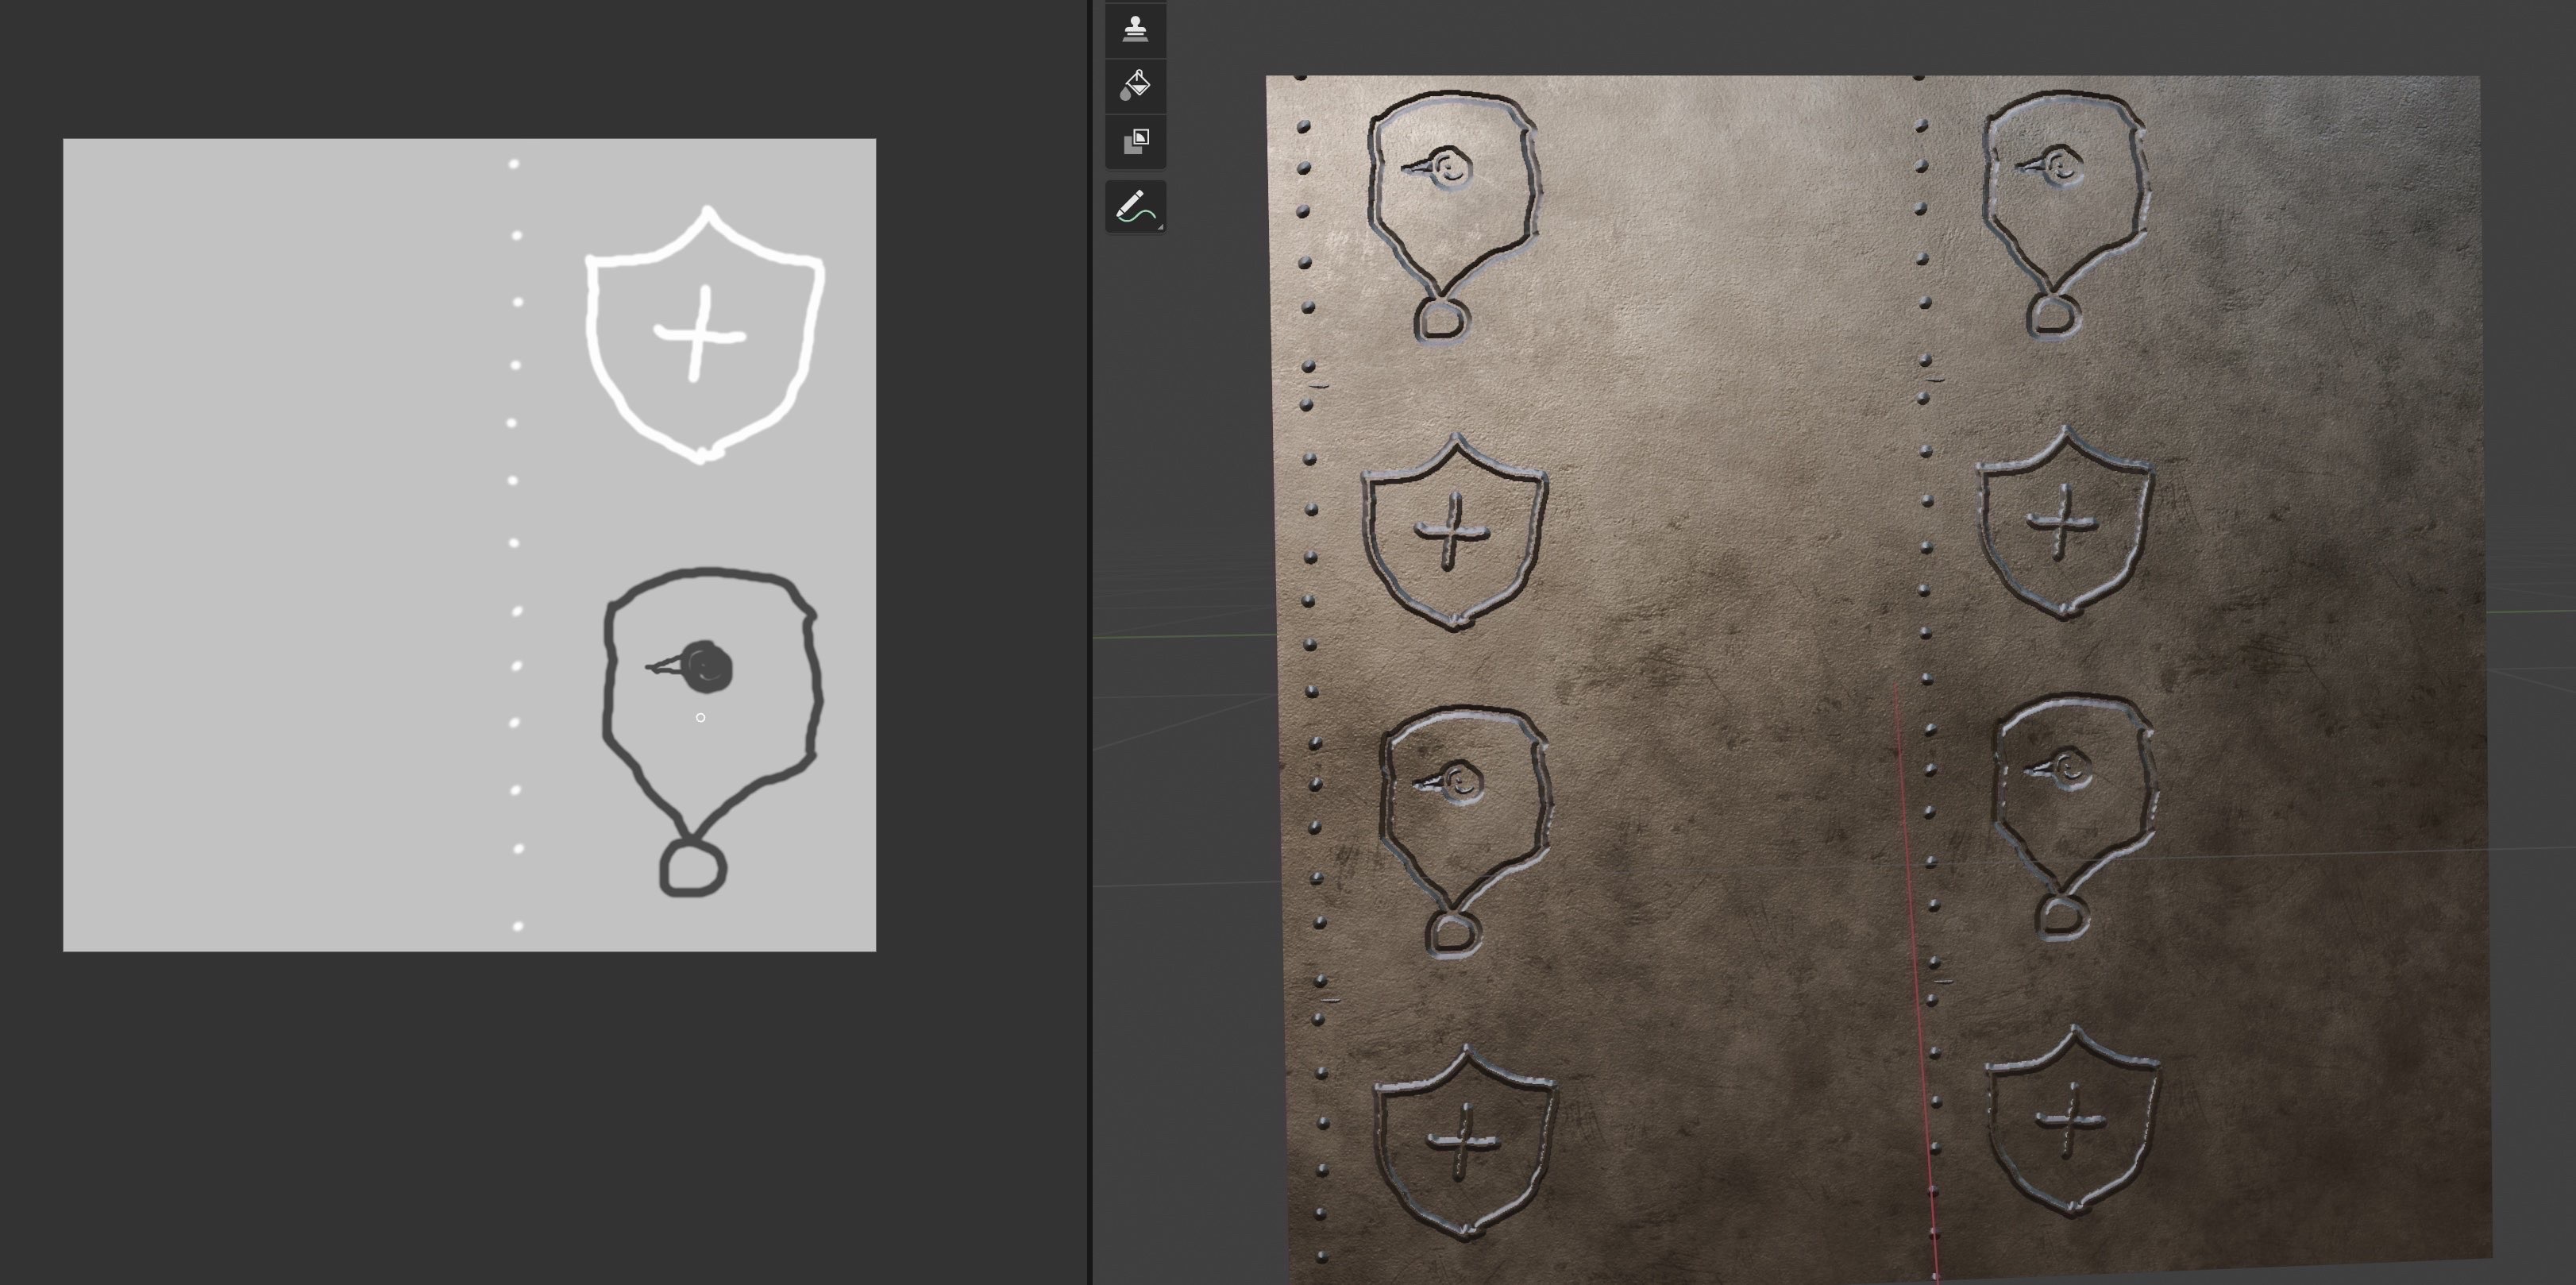
NS: Next will eb makign an external bump map will be much the same
DS: so basically how do we get this into SL?
NS: that ahs to be baked has
DS: next lesson, We’ll bake the normal map